Building Replicas of Vox Cabinets and Heads
Copyright 2000 R.G. Keen. All rights reserved.
No serving from pages other than http://www.geofex.com.
Lots of us have been willing to commit lots of money to buying Vox equipment.
The stuff has gotten scarce enough that the prices are high and the availability
is low. I'm a do-it-yourself kind of guy, and I recognized long ago that I could
start with a sheet of plywood and wind up with equipment housings. This is the
first of a series on making your own Vox replica cabinets. Note that this is to
make replicas, not fakes to be pawned off as originals. It's not likely that any
knowledgeable Vox fan would be fooled about them being original at close
inspection - but it is possible to make something that is clearly close.
Styling Touches
Thomas Vox products got their start with the look of the JMI Vox products and
modified that a bit. The styling details were implemented differently between
the JMI and Thomas products, but produced a recognizable family look. It's
not going to look like a Vox of any kind without:
- Diamond pattern grille cloth - perhaps THE defining stylistic touch. This
material is available these days from Korg, as it is used in the Korg
reissues. There are a couple of resellers that also stock it. See the
sources list.
- White piping around the grille cloth - a high contrast bit of punctuation
for the faces, and in the Thomas cabinets a functional bit of decoration.
This holds the grille cloth in on Thomas cabinets.
- Gold piping inset into grooves around the top, bottom and sides - purely
decorative, but nice. It adds a psychological substantial feel to the
cabinets.
- Black plastic corners - two screws and one nail hole in real Vox amps.
Repros are available. Two-nail-hole versions that are otherwise identical
are commonly available. We'll talk about replicating these and other special
parts.
- Black tolex - which came in three styles. The JMI amps used a "basketweave"
effect tolex and Thomas used a "wrinkled leather" pattern tolex.
Some JMI amps had a very smooth, almost but not quite shiny texture. These
are rare. The tolex used is quite thin, no fabric backing at all.
- Other touches - All the visible screws on Thomas Vox products were black
oxide. The early JMI's used all black oxide as well; some of the later
amps were finished with nickel or chrome plated hardware.
- Rollaround stands/trolleys - these are HARD to do, and usually completely
impractical for a DIY'er.
The technologies that are going to require care that are not all that common
are the following:
- Making a proper slot around the speaker board or front panel to hold the
white beading and grille cloth
- Making the slot around the cabinet for the gold piping
- Properly stretching the grille cloth
- Making those odd angles on the trapezoidal heads
Making basic head and speaker boxes - the common wood working problems
Materials
You can make musical instrument heads and cabinets out of four main materials -
plywood, particle board, medium density fiberboard (MDF), and wood planks. The
earliest amps were made from wide wooden planks for the tops and sides, and
sometimes the speaker boards and rear panels as well. Some boutique amps are
still made this way. After WWII, plywood became a less expensive and much more
predictable product than wide, clear planks. Plywood has a lot to recommend it
in terms of strength and workability. In the 60's particle board in the form of
glue-stabilized sawdust became popular as an alternative to plywood, for plywood
had gotten pricey, and particle board, which was essentially 100% waste
materials from other wood working operations had an advantage. A competing
technology that produced Masonite fiberboard finally matured in the late 70's
into a superior competitor to particle board.
All of the Thomas Vox products with the exception of the very earliest runs
of a new amplifier type were sawdust particle board. While particle board and
MDF may seem like pure cheapness in materials, they do have some advantages.
They're actually denser than plywood of equal thickness and less resonant, more
highly damped. These are advantageous in speaker cabinets in all cases except
where you happen to like the resonances other materials have. This happens with
clear pine board amps sometimes. Otherwise, a speaker cabinet should be dense,
heavy, and non-resonant, as we want to hear the speaker, not the cabinet.
The down side of both materials compared to plywood is that they're weaker.
Fasteners and joints need more care, and exposure to moisture causes them to
absorb the water, swell, and crumble. Sawdust particle board is worse about
this, but they both do it. Many Thomas Vox cabinets have died because water
dripped onto or into them and was allowed to soak in. The soaked areas swell and
eventually crumble.
So - what do we use? Presumably you want to use this thing as a musical
amplifier, and that may include hauling it to shows. For my purposes, I'd use
plywood for the extra strength. For accuracy to the original, use plywood for
JMI style cabinets and sawdust particle board for Thomas style cabinets if you
care how they look on the inside.
The premium material for all musical instrument heads and cabinets is 13 ply
(layer) baltic fir plywood. This is an import product, and comes in 5' by 5'
sheets, not the 4' by 8' sheets we're used to. It's available as a special order
item at many lumber outlets. If you go for this be aware that unlike the
plywoods you're used to, the sheet is NOT likely to have any perfectly straight
edges or square corners. Count on squaring up edges and corners by your own
efforts.
Some of the smaller cabinets use 1/2" (12mm) thick materials, but all of
the bigger cabinets and heads use 3/4" (18mm) thick stock.
Joinery
To make cabinets, you have to make joints. This can get to be an art form in
itself, as some boutique amp makers use clear hardwood planks for their cabinets
and clear finish the cabinets, fully displaying the nicely-cut dovetail joints
at the corners. A well cut dovetail is the ideal corner joint for a cabinet.
It's as strong as the two materials, stronger if you glue it, and holds where
fasteners are hard to use.
Dovetails are beyond me. If you can do good dovetails by hand or by
special jig, you don't need my advice. Finger joints are a slightly simpler
version that is also complicated to cut by hand as well as requiring special
fittings to do by machine. I don't do finger joints either, although they're not
that hard to understand and do by hand. All the Thomas Vox
heads used finger joints. Again, if you can do this, you're quite capable of
modifying my dimensions to get what you need, but you don't need my advice.
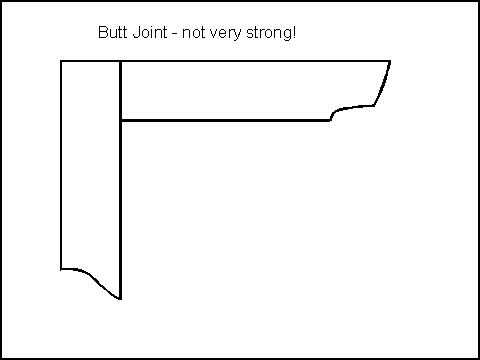 |
Butt joints are made when two pieces are just fitted end
to side. While this is simple, it's also weak. Fortunately, there are
ways to make this simplest of cabinet joints stronger. One way is with
fasteners inserted through the side- piece and into the end of the
end-on piece. These are traditionally screws in DIY speaker cabinet
building. However, we're also going to have to use a router to round the
corners of our cabinets and routers don't mix well with steel
screws. |
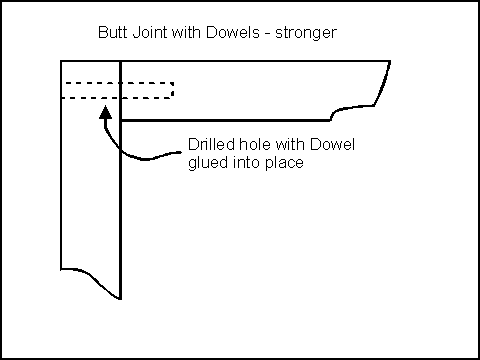 |
An old trick is to use the equivalent of the Norse "trunnels"
or literally tree-nails - dowels. You cut your pieces to fit, glue and
clamp them into position and then drill holes through the side piece
into the end-on piece, and then coat a dowel with glue and tap it in.
Several of these, maybe one every couple of inches, add a lot of
strength. You could use a bisquit joiner, but I don't have one and
neither do most people. These can be rounded off level by the router
with no missing or broken bits. |
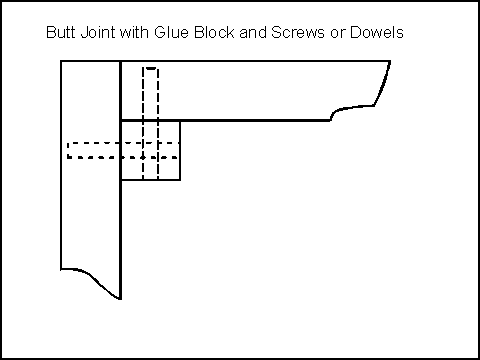 |
Another way to make a butt joint sturdier is to use
internal glue blocks. To make a square corner joint in, say 3/4"
thick stock, you cut a length of 3/4" by 3/4" stock to just
the length of the joint and then glue and screw this glue block into the
inside of the joint. Again, you could use dowels; however, the glue
block attachment moves the fasteners away from the corner enough to miss
the router path for rounding corners in most cases. This gets a lot more
glue area to hold, as well as reinforcing the corner against flexing.
This is a good way, and easy to do. We'll wind up doing glue blocks for
attaching back panels anyway, so this is a good way to approach it. Done
properly, a glue block joint is quite strong as well as fairly simple to
do. This will be my default method for making joints. |
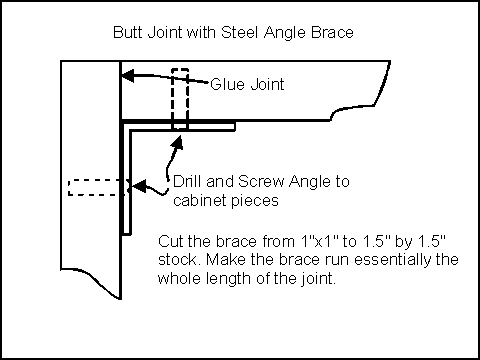 |
Finally, you can use another material for reinforcing.
Steel angle can be cut to fit the joint and then secured with screws to
the corner. The steel angle then becomes the corner, and the
overlaps of the other pieces just a way to couple the steel corner to
the rest of the box. Done properly this is very strong and not obtrusive
at all. This is well suited to cabs that you're going to haul around and
punish a lot. It's limited to 90 degree corners, though, so it's not
going to be useful for making those trapezoidal heads. Aluminum angle
works, but is more expensive and not as strong. |
Allowing for the White Beading
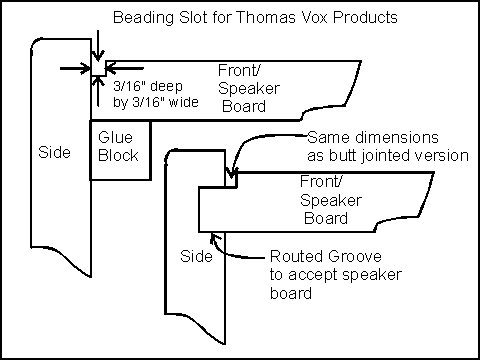 The grille cloth on Thomas Vox
products is held in place by the pressure of the white plastic beading, which is
forced into a slot set into the speaker board just at its joint with the sides
and top of the cabinet. This slot is done by routing the edge of the speaker
board (or front panel on heads) to the proper dimensions before fitting the speaker board to the
sides/top/bottom. If you're doing butt joints, simply cut the speaker board to
size and run the front edge through a router set in a router table to cut the
right size relief into the corner. If you're a more advanced woodworker and you
want to inset the speaker board into the sides and top all around, you'll have
to not only cut the speaker board larger to fit into the slot in the
sides/top/bottom, but also route a larger beading slot and the inset slot in the
sides/top/bottom themselves. Again, this is a more elegant but harder technique
to get right as it makes the routing of both the slot for the inset in the sides
and the relief on the front surface of the speaker board more critical.
Don't put the speaker board into the sides/top and then try to cut the
beading slot. It doesn't work well, largely because the speaker board/front panel on Thomas Vox products is inset 1/4" from
the front edge of the sides/top/bottom. This makes routing it in place
very tricky work indeed.
The outer corners of the front and back of the sides/top/bottom of Thomas Vox
products are rounded with a 1/4" radius quarter-round router bit. The
joints of the sides to top and bottom are rounded with a 3/4" radius
quarter round router bit. You should plan on using carbide tipped bits, as
particle board and plywood eat up normal steel router bits. MDF is even worse.
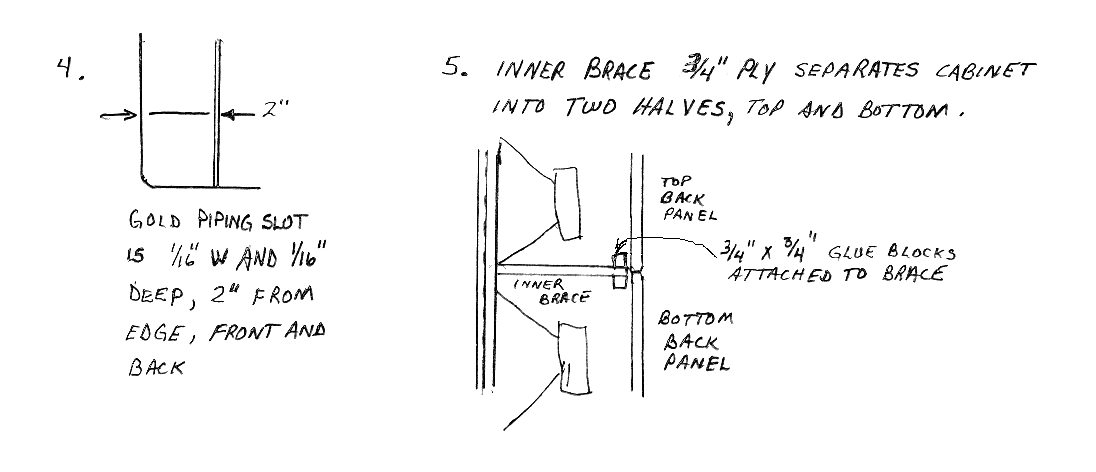
The gold piping/beading on Thomas Vox products is a 1/16" wide,
1/16" deep slot. The slot is 1.375" from the front and back edges of
the cabinet for all cabinets and heads with the exception of the Buckingham,
Royal Guardsman, and Beatle speaker cabinets, where it is set 2" from front
and back. This is properly done with a Dremel Moto tool with a router
attachment and a clearly-thought-out straightedge guide to keep it from
wandering. It must be done after the 3/4" rounding on the top and bottom
corners because the small piping slot goes right over the surface of the rounded
corner.
Big Boys
The AC-100 and Thomas Vox Beatle cabinets are the Big
Brothers of the Vox clan. I was able to obtain a poor old weather-beaten (literally!) Beatle cabinet that would not be further damaged by some
disassembly. The measurements and techniques presented here are based largely on
that box. I'll note how the cabinet is made as an original, and some things you
could do to make a replica easier to make. After all - this is a replica, not a
reproduction, so exact internal accuracy isn't mandatory.
The Beatle cabinet is 27" wide, 40" tall and 11.5" deep. For
the Beatle it contained four 12's and two horns with crossover caps. The 12's
are wired all in parallel for a total of 2 ohms impedance. The AC-100 cab
is the same size, but was wired series/parallel for 8 ohms impedance presented
to the amp. The cabinet is
divided neatly in half by a plywood shelf in the center of the cabinet
vertically, acoustically making it into two identical 2 x 12 cabinets. The back
covers are also separated on the middle line. There were two versions of the
back panels, one closed and one opened.
It's possible to make a Beatle cabinet from a single sheet of 4" by
8" plywood or particle board. The original AC-100's were plywood, but
Thomas quickly went to the sawdust kind of particle board. If you're going to
gig with the cab, I'd recommend plywood, as particle board disintegration is
what kills a lot of them - the one I have included. Check with your local lumber
supplier for materials availability.
There's a great deal available in "Para-Ply" plywood. This
is a Guatemalan import made of "guatumbo" wood, whatever that is. It's
a blonde hardwood, and 3/4" thick 9-ply sheets are available for about $33,
at least here in Austin. I'll show the cutting diagram for the single-sheet
cabinet.
What makes Vox cabinets hard is those pesky styling details, of course.
I'll cover how those are done on my cabinet.
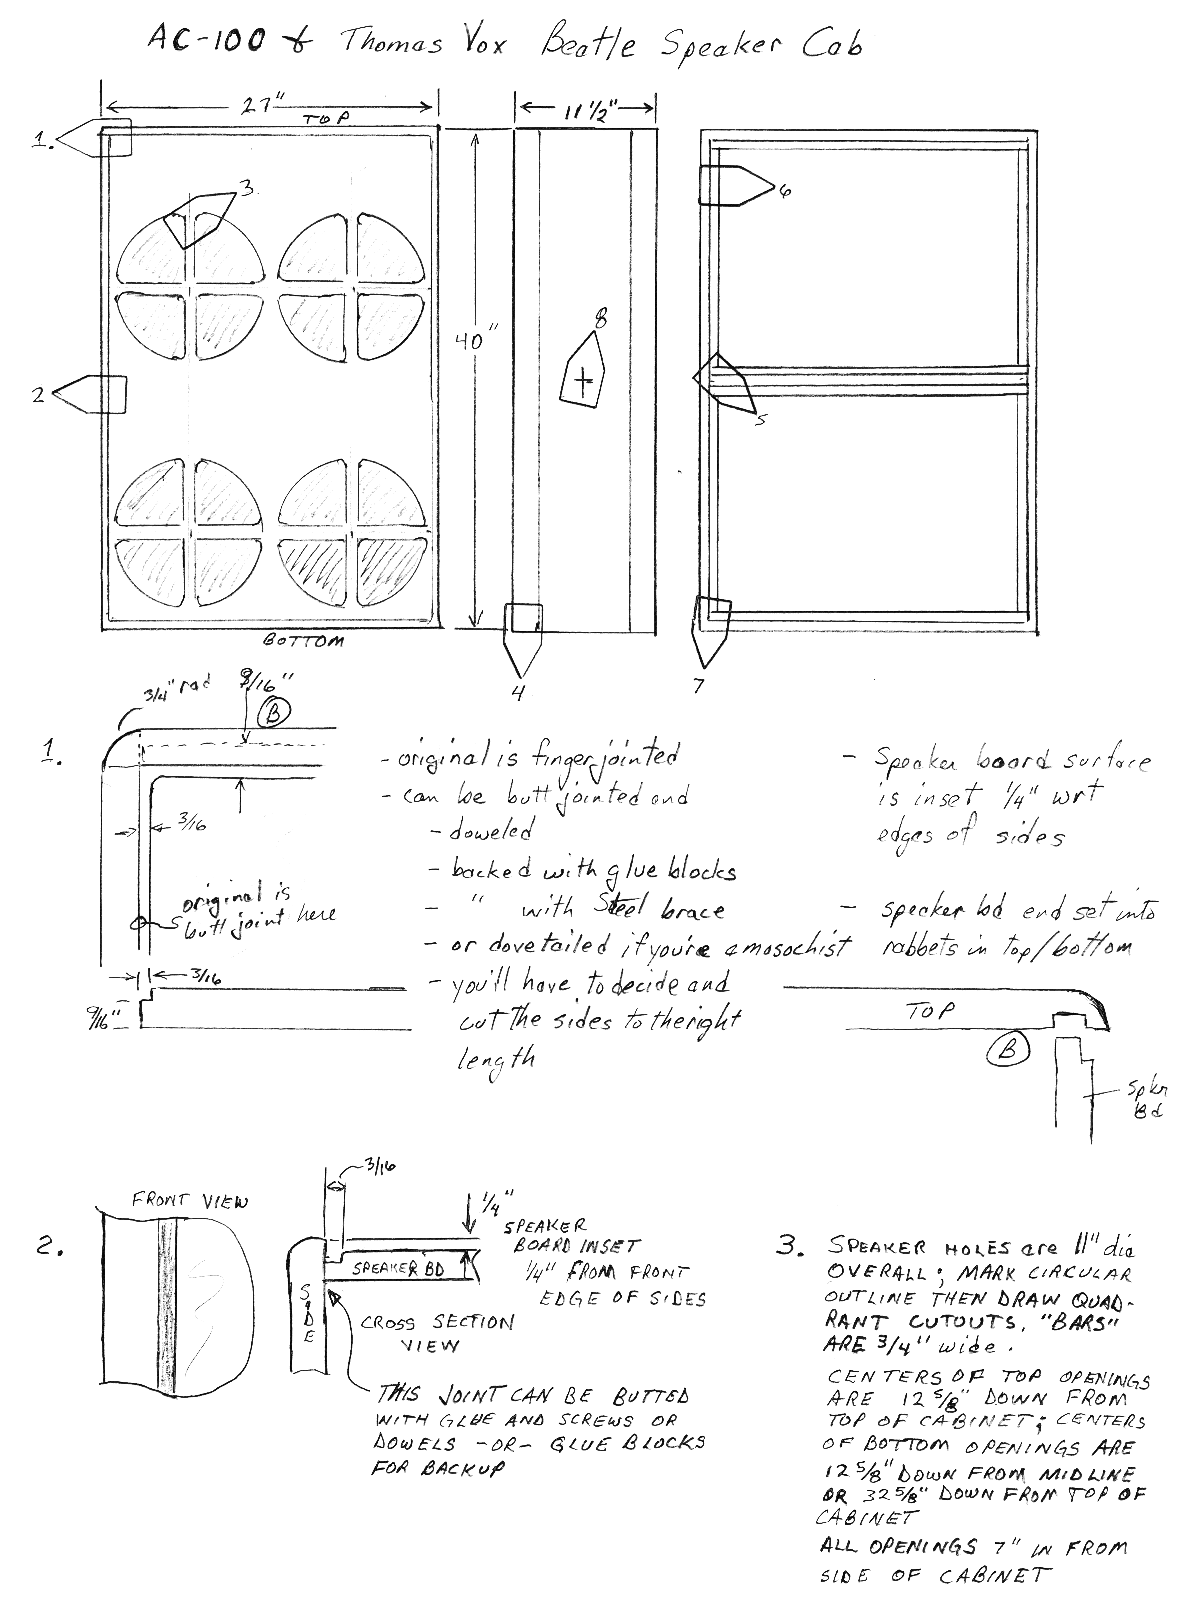
As I noted in the earlier discussion of corner joinery, you need to decide whether you're going
with fancy reproduction woodwork or looks-right-from-the-outside woodwork. The
joints of the sides with the top and bottom are finger-jointed in the original
cabinets. This is great for strength, but very hard for a home woodworker with
no dovetail/finger-joint jig to do. Such fixtures area available from Harbor
Freight tools for about $50 if you want to use them. However, it is probably
just as reasonable to make easier-to-build joints. The reason this is important
is that if you're going to finger-joint the corners you'll have to cut the sides
a full 40" long and then work the fingers. If you're going with a
reinforced butt joint, you cut the sides to 38.5" long and let the top and
bottom overlap the sides.
A similar consideration applies to the speaker board. The speaker board is
inset into a routed notch in the top and bottom of the cabinet in the original
construction. I think that using a 3/4" by 3/4" glue block at the top
and bottom is just as robust, especially if you can bring yourself to use screws
to hold the glue blocks. If you inset the speaker board, cut the speaker board
blank to 39.25" to allow for the 3/8" inset top and bottom. If you use
glue blocks, cut the speaker board to 38.5". After lavishing finger joints
and insets on the corners and speaker board, Thomas butt-glued the speaker board
to the sides without even a backup glue block inside - I can't quite figure out why. I recommend using glue blocks on
the sides as well as the corners.
The detail that makes the speaker board tricky is the slot at the edge for
the white beading to hold the speaker cloth in. This is done by routing all four
edges of the speaker board to form a 5/32" deep by 3/16 wide slot all
around the speaker board where it meets the sides, top and bottom. Do this with
a router when the speaker board is being built. This is easiest if you use the
glue-blocks method of attaching the speaker board to the top and bottom, as all
the routing is the same depth around the front edge of the speaker board. If you
use the inset method, you'll have to route the top and bottom to a 9/16 width to
allow for the 3/8" of the speaker board that fits inside the slot in the
top/bottom.
Cutting the sheet.
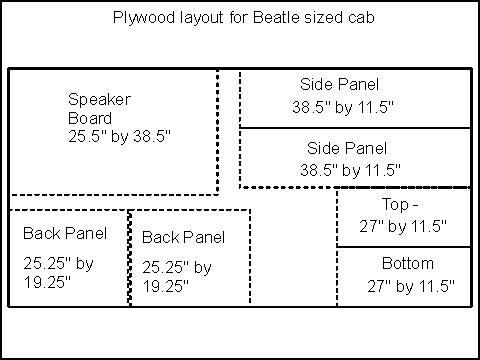 Use an accurate table saw! I prefer a plywood bit for clean cuts.
Mark out the pieces to be cut on the sheet of plywood as shown. I recommend
making rough cuts well into the waste area between the speaker board and back
panels, speaker board and side panels, and between back panels and top/bottom.
Then make precision cuts to the true size. This makes handling the full sheet of
ply less critical for true cuts.
For all the precision cuts, set your saw's fence for the proper size
cut, then test and adjust it
on a scrap piece of wood. Once it's accurate, do your actual cut on the plywood.
In spite of there being enough area on the panel, I can't come up with any way
to get the 9.75" by 25.5" interior panel out of the sheet because of
the allowance I have to make for saw kerfs. The interior panel will have to come
from some other source - which is reassuring because the interior panel is from
plywood, not particle board in the Beatle cabinet I measured. Thomas had the
same problem!
If you're an economy nut, you could slice up the excess into
3/4 by 3/4 glue blocks, but I think that ordinary wood strip is better for that
task because the glue blocks need screws going through them both direction, and
one of these is certain to be parallel to the layering. This will cause the
layers to separate in almost every case.
Making the speaker board
Set your router to make the requisite 5/32" by 3/16" edge route and
route the entire edge (route the ends to 9/16 if you're doing the inset
version). Mark the speaker holes complete with the crosses to be left, then
drill starter holes and saber-saw out the quadrants with as fine a blade as you
have. Clean up the edges with a
sanding block, as saber saws leave a fair amount of splintering.
Decide on your fastening method
You really need to decide if you'll use screws or drill-and-dowel fastening. If
you use screws, you need to make sure that none of them will go where the edge
routing happens, as hitting a screw with a router is unpleasant at best. You are
generally going to be OK if you put screws through the glue blocks into the
cabinet outside parts from the inside of the cabinet, as this gets the screw
ends more than 3/4" away from the corners to be rounded.
Start gluing
Find yourself a flat, smooth stretch of floor. Put down some kind of 1/4"
spacer for the speaker to lie on - several scraps of 1/4" plywood is ideal.
With the spacers down, lay the speaker board face down on the spacers. Assemble
the top, bottom and sides standing vertically around the edges of the
speaker board. You can hold them upright and in proper position with a band
clamp or rope tied around the top/bottom/sides. Place and mark the interior
partition's position. Assuming you're doing glue blocks, measure and cut 3/4" by 3/4" glue blocks to go
around the interior corners, trying for a close fit. Pre-drill the glue blocks
for a screw or dowel every 6" or so, and glue the glue blocks into position
on the sides, top and bottom around the back of the speaker board. Run screws in
as you go. You may also run screws in and remove them, after the glue sets,
drilling the holes out for and refilling with dowels if you want to be sure you
don't have a screw where a later operation will hit it.. At this time, also put the
glue blocks in place for the corners. If you're using screws, think about
putting them where corner rounding and/or routing for gold piping will not hit
the screw tips!
Once the glue blocks are in place and screwed down on the sides, top and
bottom, glue and screw the speaker board in place. Insert the screws from the
inside of the cabinet so they won't show from the outside. Let the glue
dry!!
Mark and place the interior partition, and glue and screw it into place.
Once the glue is set, glue and screw the glue blocks into the back of the
cabinet inset by 3/4" from the cabinet's back edge to allow the back panels to be inserted.
Radius the corners with a 3/4" radius quarter-round router bit. Using a
carbide blade is a really good idea here. Radius the edges of the front and back
with a 1/4" radius quarter round bit as well. Check the slot dimensions for the white beading on the speaker board
and adjust with wood filler if needed. Route the 1/16" by 1/16" slot
for the gold piping around the sides, top and bottom. Spray paint the speaker
board flat black. Once this is dry, spread a layer of glue and glue down the
fishnet style scrim cloth.
Cover with tolex.
For a good in-depth set of pictures showing the process of putting tolex on
am amp, see....
Insert gold piping.
The gold piping is simply pressed into the grooves around the cab. Be sure to start and stop the piping at the bottom. You may need to put in glue at the start/stop point.
Superglue would work fine.
Add corner protectors
This is easy - just place them neatly and run in the two wood screws and the
brads that hold them on the corners.
Put in speakers, hardware and handles.
Do this before placing the grille cloth to avoid damaging the fragile and
expensive grille cloth.
Test.
Wind it up and shake it out. It should roar! Fix any problems before the
grille cloth goes on.
Install grille cloth.
Stretching the scrim cloth and grille cloth is tricky. Do the scrim first.
Work from the center out. That is, get the centerline of the scrim in the vertical dimension straight on the centerline of the cab,
gluing it to the edges of the flat baffle area as you go. Work out from the centerline in a balance way, ensuring straightness and alignment as you go. Let the glue dry.
Thomas used some kind of glue on the scrim.
For the grille, this applies, but more so.
First, ensure that your white piping is a perfect fit when pressed into the recess around the edge of the baffle. The grille cloth is held in only by the white piping. I personally liked using about two dozen small
nubbins of plastic that could be pressed into the binding slot before the piping goes in. This lets me get the cloth into place and held there before I press in the piping and makes the piping placement easier to do. If you have excess white piping, cutting a number of pieces of this is ideal, but the stuff is expensive, so maybe you can find other nubbins of stuff to use for
temporary holding while you get the grille cloth straight and press in the white
piping.
Align the centerline of the cloth up the vertical centerline of the cabinet. Press in a nubbin at the top center. Stretch the cloth gently to the bottom along the centerline and press in another nubbin. Now the vertical centerline is straight. Gently get the horizontal centerline straight and press in nubbins on each side. Work out from the center lines, getting the cloth straight and putting in temporary nubbins. Stretch gently(!) and get it all straight first with the nubbins.
There will be small sags between nubbins, but you'll straighten that out as you
press in the piping. You're trying to get the mass of area in the middle
straight.
Once it's all in place and even, find the center of the white piping. Remove the top center
nubbin, and holding the grille cloth in place (having a lovely and talented assistant helps here) press the center of the white piping into the groove to hold in that section. Work from top center out, removing a nubbin, getting the section straight, and pressing in the white piping. Work your way evenly around both sides equally and the bottom, finishing at the bottom center.
I've heard of people temporarily tacking strips of wood around the edges of the grill cloth covered baffle to hold the cloth straight, but I never could get that to work well.


 The grille cloth on Thomas Vox
products is held in place by the pressure of the white plastic beading, which is
forced into a slot set into the speaker board just at its joint with the sides
and top of the cabinet. This slot is done by routing the edge of the speaker
board (or front panel on heads) to the proper dimensions before fitting the speaker board to the
sides/top/bottom. If you're doing butt joints, simply cut the speaker board to
size and run the front edge through a router set in a router table to cut the
right size relief into the corner. If you're a more advanced woodworker and you
want to inset the speaker board into the sides and top all around, you'll have
to not only cut the speaker board larger to fit into the slot in the
sides/top/bottom, but also route a larger beading slot and the inset slot in the
sides/top/bottom themselves. Again, this is a more elegant but harder technique
to get right as it makes the routing of both the slot for the inset in the sides
and the relief on the front surface of the speaker board more critical.

 Use an accurate table saw! I prefer a plywood bit for clean cuts.