Copyright 2000 R.G. Keen. All rights reserved. No permission for posting from web sites other than http://www.geofex.com.
I'm the proud owner of several Vox products, and like most Vox owners, I'm interested in keeping my amps in as good a condition as possible. Our house gets fairly dusty, but worse yet, I found one of our cats eyeing the grille cloth with evil intent, so I vowed to get covers for them.
Right. Like I'll just go out and buy one of the hardest to find accessories for these amps. A little looking convinced me that I was seriously in error in deciding to buy dust covers - they're rarer than the amps!
I do have the stock covers for one of the amps, my pride-and-joy tube Berkeley, and so I decided to have a look and see how amenable they are to reproducing. It turns out that with some reasonable effort, you can make repro covers that look very much like the originals.
First, find materials. Vox dust covers are thin black fabric backed vinyl. Although the vynhide/tolex amp covering is hard to find, suitable dust cover material was easy. The first place I looked, an auto upholstery supplies store, had the right stuff. The dust cover vinyl is almost smooth, just a barely visible grain. It's also cheap at about $5 a yard, 54" wide like most bolt goods. To do a good repro, you also need to replicate the white vinyl sewn edging and the white piping to sew into the seams.
I had a much worse time finding piping. I finally settled on making the piping by wrapping the same white vinyl sheet I found for the edging around a length of nylon seine twine from Home Depot. The white vinyl itself came from a fabric outlet with a good stock of upholstery items. Turns out they had the same black vinyl as well. More on making piping later.
If you've ever sewn before, the conceptual construction of the dust covers is trivial beyond belief. What we want to do is make a rectangular bag that is just a bit larger than the head and/or speaker cabinet, just enough extra room or relief to allow it to slip over easily. The seams and edging are all straight, no fancy cuts to be made, darts to take, etc. Even if you've never sewn before, you can do this.
It's even possible to make pretty realistic white block-lettered Vox-looking logos on the vinyl material without spending a fortune.
1. Measure your amp; get a good ruler or tape and measure the overall height, width, and depth of the cabinet, or head and cabinet if you have a two-piece. I have several of these amps, and the table below lists the ones I know (in process of being filled in!). If you have one of the amps I have no data on and you feel generous, email me the dimensions!
|
Amp |
Speaker/Cabinet Size | Head Size | ||||||
|---|---|---|---|---|---|---|---|---|
| Height | Width | Depth | Dist to Swivel Ctr. | Height | Bot. Width | Top Width | Depth | |
| Pacemaker/Nova | 16.0" | 16.0" | 7.75" | - | - | - | - | - |
| Pathfinder/ Cambridge | 16.0" | 21.0" | 9.5" | - | - | - | - | - |
| Viscount | 23.875" | 29.0" | 11.5" | - | - | - | - | - |
| Essex Bass | 31.5" | 21.5" | 13.5" | - | - | - | - | - |
| AC-4 | 16.5" | 16" | 7.5" | - | - | - | - | - |
| AC-10 | 18" | 18" | 9" | - | - | - | - | - |
| AC-15 | 20" | 21" | 10" | - | - | - | - | - |
| AC-30 | 27" | 21" | 10" | |||||
| All Berkeley's - tube, II & III | 17.5" | 27.5" | 9" | 8.5" | 27.5 | 9" | ||
| Buckingham | 20.5" | 27" | 11.5" | 9" | 27" | 10.5" | ||
| Royal Guardsman | 31" | 27" | 11.5" | 9" | 27" | 10.5" | ||
| Beatle | 40" | 27" | 11.5" | 20" | 9" | 27" | 10.5" | |
| Westminister | 31" | 27" | 15" | 10" | 21.5 | 11" | ||
| AC-30 Super Tw | 27" | 21" | 10" | 9.5" | 27" | NA | 10" | |
| AC-50 Small box | 20.5" | 27.5" | 10.5" | 7" | 19" | NA | 11" | |
| AC-50 Lrg. Box | 22" | 33" | 11.5" | 9.5" | 21.5" | NA | 11" | |
| AC-100 | 40" | 27" | 12" | 7" | 19" | NA | 11.5" | |
Note that these are the actual overall dimensions of the head/box itself, to which you'll have to add relief and seam allowances to get the cut size of the material for the covers.
2. Calculate how much material you'll need. This is the only really tricky part, because you have to figure out and allow for the extra relief room to allow the completed cover to slip over the box, and also add a bit more for seams, but only where there actually is a seam.
For the speaker boxes I'm familiar with, the covers are built the easy way - one large piece of vinyl wraps over the box from back to front, and two rectangular side pieces are sewn in. This avoids making two seams, the top front and top back ones. All you really need to do is accurately measure your cabinet/box as above, then add a bit to make it easy to slip over the cabinet, and yet a bit more so you can sew the seams. The one set of covers I have fits a Berkeley. The seam-to-seam distance on the width and depth of the covers is 1/2" larger than the overall dimensions of the box, and there is 1/4" of material inside each seam. The cover allows 1/4" room at the top and 1/4" at the bottom more than the height.
For illustration, the Pathfinder is 16" wide, 16" high, and 7.75" deep. We need one piece of vinyl that will cover it from the floor in the back, over the top, and down to the floor in front. That piece of vinyl needs to be 16" + 1/2" room + 1/2" (two 1/4" seams) or 17" wide. The section of this piece that covers the top needs to be the same 17" wide, but only 7.75" + 1/2" room or 8.25" long; we don't add a seam allowance because the back-top-front piece has no seams there. So the overall length of the piece is 1/4" overhang at front + 16" high +1/4" (room at the top) + 8.25" (top plus room) + 1/4" room at top + 16 " high at back + 1/4" overhang at back, or a total of 41.25". This piece is then 17" by 41.25" overall.
The sides to be sewn in are 16.5" long by 8.75" wide. The
sides are 1/2" wider than the top section of the front-to-back cover
because the top section has no seam with the front and back, but the side pieces do. We
need two pieces 16.5" long and 8.75" wide.
The vinyl stock is usually 54" wide, so we can cut a strip 17" wide all across the width and get the front-to-back piece and one of the sides from it. Unfortunately, the remaining piece is just a bit too small to make the second side, so we need another 8.75" along the bolt at minimum to cut the second side. The remaining scraps can be used for reinforcing the handle hole as we'll see later. The total for a Pathfinder cover is then 17" + 8.75" or 25.75", comfortably under one yard of vinyl. Since upholstery vinyl has no preferred direction or grain, you're free to orient the cutting for the pieces in any way that gives most efficient use of the material you buy.
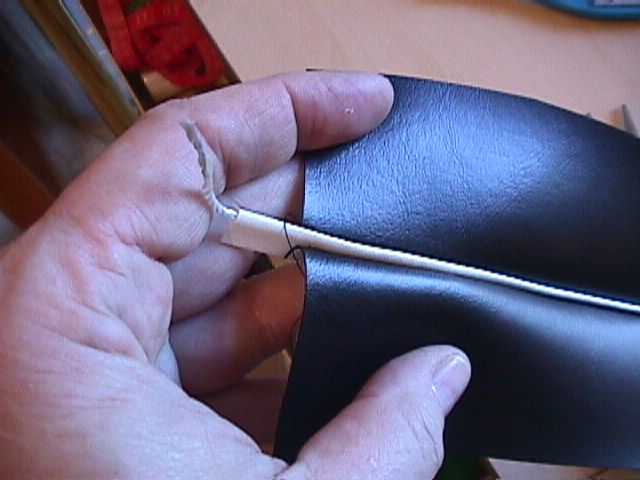
You'll also need piping and edging. Upholstery shop piping is available, but I could not find any of the correct (small) diameter, about 0.1". I decided to buy white vinyl sheeting and sew a cord in a wrapping of vinyl for the piping, as well as using the vinyl for edging. The white vinyl on Thomas Vox covers looks very much like smooth-ish white shower curtain vinyl, and that is one possible source. I bought white fleece backed vinyl at a fabric store. You'll have to buy a piece at least as long as the longest single run of piping you expect to do. Since I will be making covers for my Beatle cabinet some day, this meant that I had to buy 3+ yards of the stuff to get a single piping run up one side and down the back.
For the example Pacemaker, we only need 16.5" +8.25"+ 16.5" or 41.25" as the longest run, so you need one and a quarter yards. This will be plenty of material for both piping and edging. You'll also need a length of #18 or so nylon seine twine for the cording to wrap with the white vinyl to make piping. This comes in great long rolls, so just get a roll if you don't already have one. I decided that rather than try to cut the piping vinyl to exactly the proper width, I would cut it extra wide, fold the vinyl around the nylon cord, and then trim it to the proper size. This worked out very well.
I cut a strip of white vinyl 1.25" wide (the width of my yardstick - this was handy!) and as long as my vinyl material, which was 108" as I intend to make a Beatle cover later. I laid the white vinyl out, fabric side up, on newspapers in my garage, and sprayed the fabric side with Rawn Spray Adhesive, a pressure sensitive adhesive found at crafts stores. I then laid a length of nylon twine down the center of the back of the vinyl strip, and folded the vinyl over the cord to make piping. I just folded the vinyl to make the edges meet and pressed the cord into the center of the fold. This turned out to be pretty simple to do. Once the piping strip was made, I cut two appropriate lengths and trimmed the "tail" of the piping outside the cord to 1/4", the width of my seams.
3. Layout and cutting. This is fairly simple. Since there is no grain, just lay out the measurements however the pieces fit best on your purchased vinyl. If you're new to sewing, it might be a good idea to first cut newspaper or kraft paper to your calculated sizes and tape or pin them in place around the amp to check that your measurements and calculations for room and seams are correct. Once you're satisifed that the pieces are the correct size, you can just lay the paper onto the back side of your vinyl sheet and mark the edges of the paper pieces. Read and note the section on seam allowances in the "Sewing" section before cutting! If you need larger seam allowances, you have to measure and cut the material bigger.
You can mark the fabric (also referred to as the back or wrong side) side of the vinyl with either dressmaker's chalk, pencil or ballpoint pen. I used both dressmaker's chalk and ballpoint at different times.
Use a straightedge or yardstick to mark and cut carefully, keeping the edges straight. This will make your sewing job much easier later, as you won't always be struggling to make a straight seam from the crooked edges.
4. Sewing; Fold the large piece of vinyl that will become the front/top/back end to end and mark the center of what will become the top of the cover across the top. This center mark will be used for aligning the side pieces and for the handle cutout. Fold the side pieces across the long dimension and mark the center at both ends. This center mark will be used for aligning to the center mark on the top and for the swivel cutout, if any.
 I highly recommend that you sew a test strip with piping in it first before
trying to sew your laid-out and cut vinyl. This will tell you if there is any
problem with your technique or your sewing machine in time to correct either one
before you waste the cut vinyl.
I highly recommend that you sew a test strip with piping in it first before
trying to sew your laid-out and cut vinyl. This will tell you if there is any
problem with your technique or your sewing machine in time to correct either one
before you waste the cut vinyl.
Clamp or pin the top edge together, wrong sides out, with the piping in the center of the seam. Align the center marks on all three pieces to ensure that they are properly aligned. I used small binder clips, available from office supplies stores, to clamp the seams in place rather than pinning the seams together while sewing. This proved to be very easy to work with and much more useful than pinning the seams.
Once you have the top centers of top, side and piping clamped or pinned in place, start sewing the seam. Sew a few stitches, press the "reverse direction" button on the sewing machine for a couple of stitches to lock the seam start in place, and run the seam down to the first corner. Use the clips and sheer force to force the seam to lie fairly straight in the corner, and get it sewn. You might even want to hand-tack the corner with a needle and thread to keep it in place while the sewing machine makes the seam. Once around the corner, sew all the way to the bottom edge. Reverse direction to lock the last stitches in place and remove and trim the remaining threads.
Start again at the top seam and sew down the opposite side. All this working from center out keeps the sides and top relatively square, so the final cover doesn't look twisted or skewed.
Notice that I used a 1/4" seam allowance - if your sewing skills demand a 3/8" or 1/2" seam allowance, do that, but recognize that you'll have to already have cut the pieces larger to begin with because you're eating more of the material in seams. So know this before you cut up all your vinyl material!
 Once
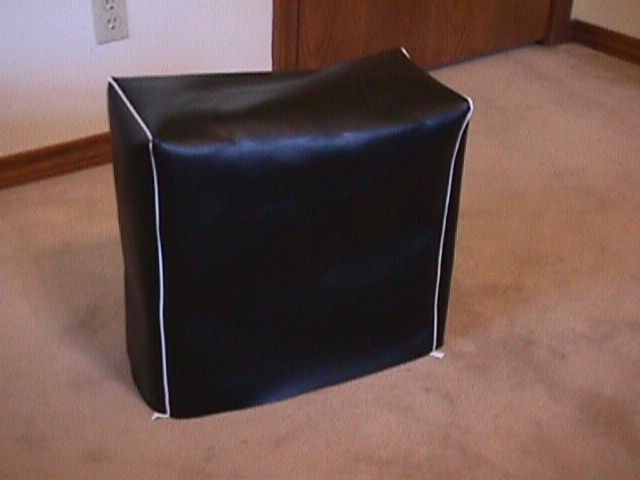
the box is sewn up, you'll have a fairly clean-looking vinyl "sack".
The Pathfinder cover was small enough to actually stand up by itself, as shown
at right. The white tags at the bottom of the corners are the extra length of
piping that will be trimmed away. (The sewing is, of course, done with the thing
inside-out; I turned it right-side-out to appreciate my work!) From here, only
two steps remain. The bottom edge needs to be trimmed and edged, and the hole
for the handle needs worked.
Once
the box is sewn up, you'll have a fairly clean-looking vinyl "sack".
The Pathfinder cover was small enough to actually stand up by itself, as shown
at right. The white tags at the bottom of the corners are the extra length of
piping that will be trimmed away. (The sewing is, of course, done with the thing
inside-out; I turned it right-side-out to appreciate my work!) From here, only
two steps remain. The bottom edge needs to be trimmed and edged, and the hole
for the handle needs worked.
To trim and edge, temporarily fit the cover over the amp, straighten it up at the corners and mark the right length below the bottom edge of the cabinet itself at each corner. Remove it, and use a straightedge/yardstick to draw straight lines between the corner length marks, and then cut on these lines. Take a strip of 3/4" wide white vinyl long enough to go completely around the bottom, fold it in half, good side out, and sew it over the edge of the bottom opening.
If you're making a cover for an amp with side-swivels, you'll have to mark and cut the openings and side-slit first before you can get it onto the box for marking and test fits, of course. Also, you'll have to cut edging and sew around the slit and opening on the sides.
Working the handle hole(s) is a bit more complicated. With the cover fitted over the cabinet wrong-side out, mark where the handle is with dressmaker's chalk. Mark the handle location and add about 1/8" to 1/4" extra room for the handle, and then remove the cover. Mark a line down the center of the soon-to-be handle opening , and a "y" at 45 degrees into each corner. Cut the two Y's and the line down the center. The vinyl will now fold in to the opening to make a rounded-edge opening. You may use either a vinyl mending glue or a fabric glue from the fabric store to hold the folds in place. This is really all the opening needs. However, if it will get a lot of use, you really should reinforce the corners with scraps of cut vinyl to keep them from tearing. This can be done with glue, or sewing, or both!
5. Logo
The distinctive Vox block-letter logo was screened onto the
manufactured dust covers. I didn't think that I would be able to replicate this,
as I did not intend to pay for setting up and doing screening on so few pieces.
However, with some thinking I was able to come up with a strategy for imprinting
a logo as
well. Since the logo in question is a registered trademark owned by Korg, I do
not recommend that you use the Vox logo; I only put it here for completeness, so
illustrate how this could be done.
In point of fact, the method lets you put *any* artwork on your dust covers in a professional-looking manner. I tried this with the Vox logo and took these pictures for purposes of illustration, but I have since covered the logos on my covers with my own design, so the covers no longer have the logo imprinted on them.
The secret is in two technologies - making a good masking stencil and spraying with a paint intended to color vinyl upholstery. The spray paint is an automotive product, and I got my can of white vinyl upholstery paint at my local Auto Zone. Making the stencil required some work. I scanned the block logo on my real set of covers, and then retouched them to eliminate the jagged edges and inaccuracies of the real product, then did a set of outlines at the edges of the letters. Once I had an accurate outline, I printed a page full of outline copies.
I cut a strip of 2" wide masking tape and stuck it onto a window. I then cut out one of the logo-outlines and masking-taped it on top of the 2" wide base strip. I then used a razor knife to cleanly cut on the outline of the letters. For the "O", I left a little rib top and bottom and side to side to hold the center "hole" in place until it got put on the vinyl. Actually, I think that this could just be cut out and placed in position by hand on the vinyl when the stencil is moved there.
Once I had the cutting done, I gently peeled the masking stencil off the glass and placed it on the vinyl, taking care not to distort the masking tape by pulling too hard as I peeled it up, and to place the logo in the correct position on the vinyl. Burnish the masking tape down well. Once the stencil is in place, very carefully slice out the ribs that hold the "O" center in and remove them.
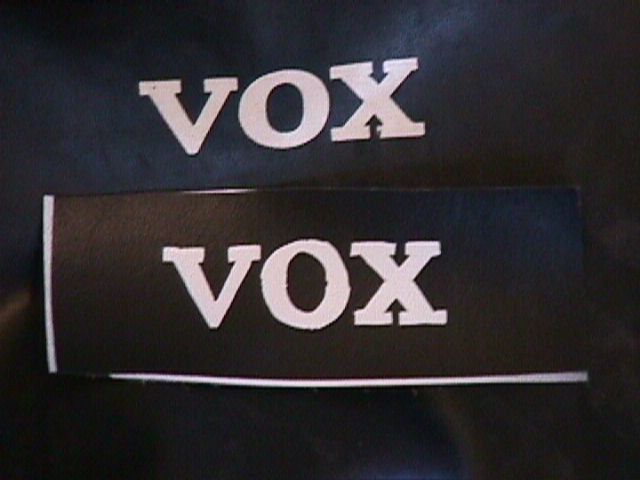 As
you can see from a comparison of the real article and the sprayed-on one, the
results aren't necessarily perfect. The logo at the top is the logo from the
original dust covers, the bottom one is the spray-on one.. However, what the
photo does not show is that the imperfections in the sprayed-on one are
*exactly* the imperfections of the stick-on mask. The technique shows every
imperfection in the mask perfectly, which is why my squiggles and unevenness
show on the spray-on.
As
you can see from a comparison of the real article and the sprayed-on one, the
results aren't necessarily perfect. The logo at the top is the logo from the
original dust covers, the bottom one is the spray-on one.. However, what the
photo does not show is that the imperfections in the sprayed-on one are
*exactly* the imperfections of the stick-on mask. The technique shows every
imperfection in the mask perfectly, which is why my squiggles and unevenness
show on the spray-on.
If I had used a straightedge for the straight lines and perhaps some magnification for my failing eyes, and more care in removing the placement ribs on the "O", the result would be indistinguishable from a screen printed logo.
I emphasize again, this was done only for experimental purposes for my personal enjoyment and has been destroyed. The "Vox" logo is property of the Korg company. You can however, make up any drawing or logo that you can print and then cut into a masking tape stencil.
The photo also shows why you have to mask the entire rest of the vinyl before spraying. This stuff is designed to mark vinyl, so any over-spray will look bad, as witness the white over-spray areas on the vinyl sample I used to do the test. Make sure that only the openings in the stencil could be hit by paint. If I do more stencils, I may eliminate the "ribs" and place any suspended letter areas by hand.
I followed directions to the letter on the paint can - a mist coat, wait ten minutes, another mist coat, another ten minute wait, another mist coat, another wait, and a finish coat. The mist coats prep the surface and prevent bleeding of later coats under the masking tape. I did a trial run on a scrap of vinyl first to try it out, and the very first try worked. The result was striking - a pure white "Vox" logo on black vinyl, with a surface that also looks and feels like vinyl. The paint reproduced the stencil area perfectly - including the imperfections where I had wavered a bit when cutting. If there is a little glitch in the stencil, it *will* show up in the painted artwork on the vinyl, so you have to do a really good job of cutting the stencil. I'm sure that this is not as wear-proof as regular screen-painted stuff, but it looks really good, and is something that the home constructor can do on the cheap.