LERA - the Leslie (tm) Effect Rotor Adapter
Pretty much every guitarist likes the swirly liquid sound of a guitar run through a Leslie rotating speaker. The doppler effects and phase shifts of the rotating speaker are an audible joy, and the speed up/ slow down of the motor spinning the speaker are a distinct audible clue that can provide a driving urgency and drama to the sound. To some degree, most of the modulated effects try to duplicate some of the characteristics of the rotating speaker setup. This covers phasers and flangers, and to some degree tremolo and vibrato effects.
What LERA does is to extend your existing phase shifter, flanger, tremolo, or other pedal with a Low Frequency Oscillator to do the logarithmic rise and fall in speed that the mechanical motor/speaker rotor does in the actual speaker cabinet. This is an ear-catching item, and a great way to get another sound out of your existing boxes. In combination with flangers particularly, LERA makes a really interesting sound.
Let's see how it works.
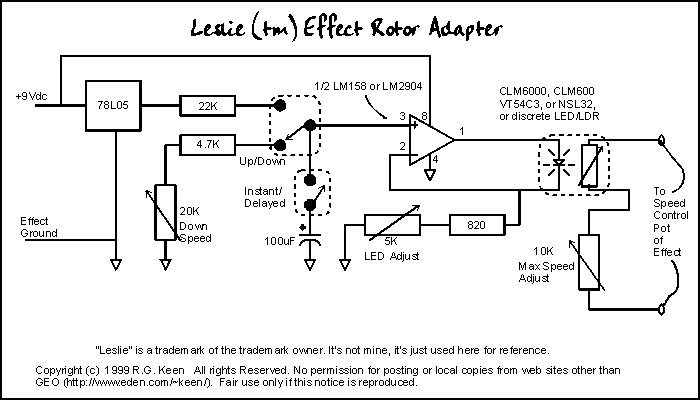
Looking at the schematic, the DC voltage from your effect or a separate battery gets fed to LERA. There, it powers a 78L05 voltage regulator which provides a stable reference voltage, and a dual opamp, only one section of which is used. A 100uF capacitor provides the electronic analog of mechanical inertia to be sped up/ slowed down. The capacitor is either charged by the reference voltage through the 22K resistor or discharged to ground by the series combination of the 4.7K resistor and the 20K variable resistor, depending on whether the Up/Down switch is in the Up or Down position respectively.
When the Up/Down switch is in the Up position, the cap charges toward the reference voltage at a rate determined by the 22K resistor - quickly at first, then ever more slowly rising to the reference voltage. When the Up/Down switch is in the Down position, the capacitor discharges toward ground at a rate determined by the 4.7K resistor and the 20K variable resistor. The resistance is variable to reflect the fact that many rotating speakers actually do slow down at a rate different than they speed up.
With the voltage on the 100uF capacitor now being a replica of the speed of a mechanical assembly, the rest of LERA's circuitry converts this into a form that can control the speed of your effect. The opamp's noninverting input is connected through the instant/delayed switch to the capacitor voltage. The opamp's output drives the anode of the LED in an LED/LDR optoisolator module, and the 820 ohm/5K variable resistor sense the current flowing out of the LED's cathode to ground. The inverting input of the opamp is connected to these resistors to sense the LED's current. With this connection, the opamp forces the current through the LED to be a replica of the voltage at the opamp's input.
If the instant/delayed switch is closed, the capacitor is connected to the opamp input and the control voltage ramps up and down slowly. If the instant/delayed switch is open, the capacitor is disconnected from the opamp input and the opamp jumps instantly from full to zero current. This switch is optional, and may be left out if you like; it was useful in some situations on our prototype.
The LED is optically coupled to the Light Dependent Resistor (LDR) of the optoisolator module. When the LED is brightest (that is, when the current through it is greatest), the LDR is at its lowest resistance, and when the LED is dimmest, the resistance of the LDR is greatest.
It happens that for the most common types of Low Frequency Oscillators (LFO's) in effects, there is a single potentiometer which is used as a variable series resistance to control the speed. The designs vary, but these controls are usually in the range of 25K to 250K in value, and most often the LFO speeds up when the control is at the lowest resistance, and is slowest when the control is at its highest resistance. This is exactly what the output of LERA provides!
To hook LERA into a pedal, you must locate the LFO speed control, and connect the output of LERA in where the speed pot was. Now when you step on the Up/Down switch, the LED gets brighter, the LDR resistance goes down, and the effect speeds up in proportion to the capacitor voltage as it rises. Step on the switch again and now the effect slows down on proportion to the capacitor voltage as it drops off. The illusion of something mechanical speeding up and slowing is very good because we have constructed an electronic model of the actual system.
LERA has been tested on a number of effects, primarily on the Ross Flanger and the TC Chorus pedal. Other pedals may or may not work, but it appears that many of them will based on a look at schematics. If the speed control on your effect is a single, not dual, potentiometer, and the resistance of the potentiometer is between 25K and 250K, LERA can probably be adapted to it.
Building LERA
LERA can be built with any number of techniques, but perfboard construction is perfectly workable. The biggest challenge in getting LERA to work is probably mechanical in nature - how you gonna get it shoehorned into that effect box? And how will you get another stomp switch into your box for the Up/Down switch
The Ross Flanger was easy in this respect, as it has plenty of room inside, but other pedals do not, so look at where it will have to fit before building your LERA. Get an idea of the size and shape of the space available to you and build with that in mind. If the pedal is so squeezed for space that it simply won't fit, consider putting LERA into a separate box, and putting a closed circuit mini-jack into your effect so you can build LERA in an external box and just plug it in. The closed circuit jack will make your effect work as normal when LERA is not attached. This makes the use of another stomp switch for LERA easy as well. I highly recommend
mounting it in an external box.So - get an idea how big and what shape the LERA board has to be, which depends on whether it is to be put inside the effect box itself, or built into an outboard box of its own. Cut a suitable piece of perfboard, place the parts and wire them up, being very careful about component polarity and placement. I recommend making a few sketches on grid paper first to see if your parts placement is do-able in the actual box you'll be building LERA into. I have provided a
sketch of one way to wire up LERA on a bit of perfboard, including parts placement and wiring.Once you get it wired up, check it out with a voltmeter on the 100uF capacitor to see that it does indeed ramp up and down, and on the + and - inputs to the opamp - they should go up and down in concert with the capacitor voltage. You can sub in a discrete LED for the optoisolator to visually see its light brighten and dim as an indicator that the opamp circuit is working. You may also be able to hook a visible LED in series with the optoisolator LED to see that there is indeed current going through the opto's LED.
If you choose
mounting LERA inside the effect box, be sure that you have room and access to the wires to get it hooked up properly.Be gentle with the optoisolator. They are somewhat heat sensitive, so make the joints clean and get in and out quickly with the soldering iron.
Obtaining LED/LDR optoisolators can be a problem. This circuit works with the CLM6000, the new CLM600 replacement, the Silonex NSL32, the Vactec VT54C3, and with an assortment of discrete LED/LDR pairs. There's bound to be one you can find. Hosfelt Electronics usually stocks the CLM6000, and Newark Electronics stocks the VT54C3.
There are some notes about the circuit. Like many DIY things, this one can be made bare bones, or featured almost to death as well as simply adjusted to fit.
The 78L05 voltage regulator is really supposed to have an input and an output capacitor on it. I've never used these in the prototypes of LERA, but some marginal 78L05's might oscillate. If you're getting odd results, test the output voltage of the 78L05 to be sure it's at 5.00V +/- 5%. If you do get oscillation, place a 1uF to 10uF capacitor from the output of the 78L05 to ground to suppress it.
The 20K potentiometer in the voltage reference section of LERA should be set by ear for a pleasing slow-down rate once all the other adjustments are complete.
The 5K potentiometer in the opamp circuit compensates for the sensitivity (or not!) of the LED in your optoisolator. You'll need to adjust this to get the range of the speed swing on your effect to be nice and smooth, as well as not "gallopy". It's a kind of gain adjustment for the LED.
The 10K potentiometer in the output circuit sets a minimum resistance (that is, highest speed) for the effect circuit. You'll need to adjust this pot once you have LERA running to get the best operation from your effect.
You can use the second opamp circuit to drive a discrete LED as an indicator. Just connect pin 5 to pin 3, pin 7 to the anode of the LED, the cathode of the LED to pin 6, and pin 6 to ground with a 2.2K resistor.