| At the other end of the complexity spectrum from the multipatched,
any-order, microcontroller powered effects boards lies an effects
setup where a few effects are all that the guitarist needs. The
protagonist for many of, James Marshall Hendrix, was a player that used
a few effects very effectively, if you'll forgive the pun.
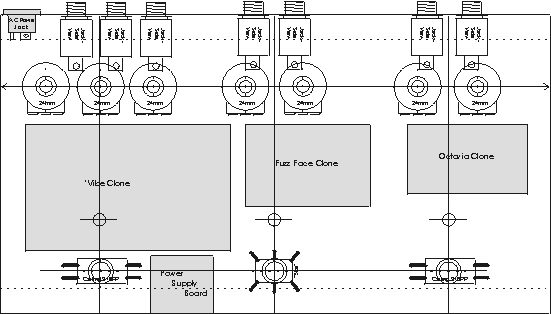
Jimi's rig was reputed to be a Crybaby, an Octavia, a Fuzz Face, and a Univibe. Well, OK, there was that wall of Marshalls and his fingers, but that was pretty much it for effects most of the time. If you like that sound and use it a lot, hooking up a bunch of effects and patching to get the Jimi jam doesn't make sense. What you want is Jimi in a box. The DIY advantage If you make your own effects, it's not much of a stretch to think of putting your Octavia recreation, your Fuzz Face clone and that ersatz Univibe into the same enclosure. The problem heretofore was getting a box big enough and the right form factor for use on stage. That changed with the Steel Stud enclosure. With the larger 2x6 equivalent steel beam, you have all the space you need to hook up a row of effects in the same enclosure, and enough front panel space for the controls. Making a Jimi In A Box is largely an exercise in the art of the Effects Wrapper. There are some advantages in making one big wrapper. For performance use, it's much easier to carry and set up. For an integrated multi-effect unit, you can easily integrate the power supply into the case, and eliminate multiple batteries and/or another box with a battery eliminator. Integrating a high quality power supply into the unit gives you the freedom. While you might think that using a single big wrapper lets you use far fewer jacks since the connections are internal (and that might be right) as we'll see later, you probably want to provide for different patching orders. This is easy, just uses the same number of jacks as individual pedals. A Big Wrapper So how big a box do we need? We already know that octavia clones and fuzz face clones will fit inside the small Hammond die cast enclosures. A univibe clone won't - it really needs more front panel space for controls. So mentally placing two 1590BB's and a 1590DD side by side is a reasonable guess. There's another way to get there. A human foot (in Doc Martens, standard footwear, right?) is about 4-5 inches wide. We'll still want a bypass switch on each effect. I decided to set them 3" apart so it's possible to stomp two adjacent ones if you really want to, but to also have a full 6" to hit that middle one if that's the only one you want. A good quess for the overall length is between ten and 14 inches wide for the whole mess. If we use the 2x6 steel stud, any length in that range gives us room. Doing a little mechanical drawing using some of the templates from my templates page here at GEO we can quickly come up with the following sketch:
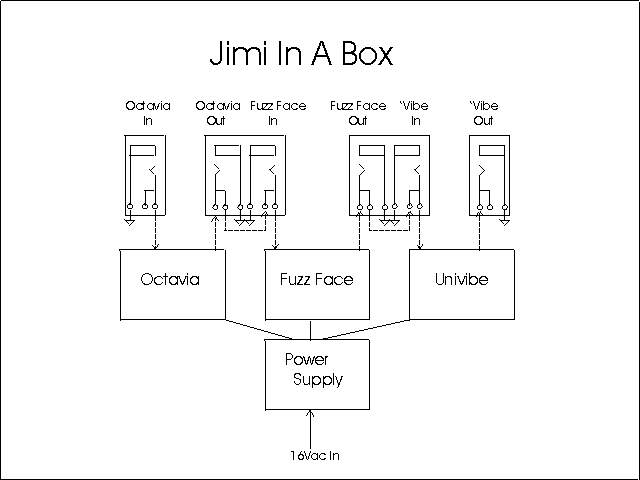
The board sizes are from the GEO layouts of each effect. The Fuzz Face Clone board is actually my Fuzz Face repair board - an exact sized replica of the original, including the original wiring out and mounting holes. I used one of each major kind of DPDT switch for illustration. The parts were drawn real sized and then the whole thing shrunk for this illustration. Over, it's 11" wide, and with the 1.875" by 5.875" cross section of the "2x6" steel stud. The guide lines show where you might align holes for the stomp switches, LEDs, pots, etc. The integrated format of the JIAB lets us take advantage of the known components, and allow for some useful extensions. For instance, we might find that we'd like to re-order the effects. No problem - use normalled insert jacks. It looks like this from a conceptual view:
Notice that the jacks between the Octavia and Fuzz Face and the set between the Fuzz Face and 'vibe are interconnected. We use normally closed jacks, and connect the normally closed switch contacts together between the two. If no plugs are inserted, the two normally closed contacts connect the two effects together. When a plug is inserted, the signal goes into the plug, but not across the connection between the jacks, because the connection opens when the plug is inserted. This is called "normalling" in some audio circles. I we just want our signal straight through, Octavia to Fuzz Face to 'vibe, we just plug into the Octavia in, run the 'vibe out to the amp, and we're all set. We can ignore the jacks in the middle because the internal wiring connects them. If we decide that we'd rather have the Fuzz Face first in the order and the Octavia second, all we need to do is to plug our guitar into the Fuzz Face in jack, plug a short cord between the Fuzz Face out and the Octavia in, and another short cord between Octavia out and 'vibe in. Now the signal goes into the FF, through the Octavia, and into the 'vibe. We can patch them in any order this way. We'd also like some flexibility with the controls. Especially in the univibe case, there are some extensions we can use. It's pretty easy to hack in a remote rocker pedal for 'vibe speed, and we may even want to do some tricks with the LFO to make it adaptable to some new sounds as well. The Candy in the Box The obvious thing to do is to make one each of DIY clones of the TychoBrahe Octavia, the Fuzz Face, and the Univibe (all of which have schematics and board layouts here at GEO) and start wiring them up. That works fine, and is what most people would do. However, here in 2002, we have the advantage of about 30 years of technology over the first versions of those boxes. You might want to use other, similar effects circuits that have become available. There are true TycoBrahe Octavias, the Bobtavia, the full wave rectifier from John Hollis' Omnidrive, and a couple of other opamp driven octave up designs. Further afield, there's the MOS Doubler here at GEO for a less harsh octave scream. You have the option. Likewise, for the Fuzz Face, Jimi only had the one circuit choice (well, OK, his tech juiced up the ones he got), and by urban myth sorted through boxes of them at Manny's Music to find good ones. Today we know some of why and how to make Fuzz Faces sound good (see the Technology of the Fuzz Face), and have several variants to choose from. You might choose one of those instead of the plain vanilla Fuzz Face circuit. We even have at least one choice for the 'vibe. GEO's Neovibe, now about ten years old, is a faithful clone of the original; however, it's extendable and customizable with some of the items in the Technology of the Univibe. In addition, there are some additional tricks we can play that I'll get into later here. So pick your own personal poison. True, I could make a single PCB with all these circuits on it, all tightly integrated. But that would spoil a lot of the spirit and inventiveness in the DIY approach. Put in what YOU want. Power Surprizes! The Neovibe includes an AC-to-DC power supply on board. If we want to power the FF and Octavia from that power, it's not hard at all to tap off some DC and use a three terminal regulator or two to make whatever the other effects need. Coming installments: 'vibe extension schematics, some links to circuits to use, and hints about mounting stuff in that steel shell.
|

