Version 1.0 10/3/99 - Initial Version
Copyright 1999 R.G. Keen all rights reserved. No permission for local copies or posting from web sites other than http://www.geofex.com/.
If you're an interested effects builder, you will often run into things that you'd like to build that are too simple to really need a PCB, or you're simply in a hurry and don't want to mess with buying or making one. Perfboard and vero-board contstruction is a bit involved, and perfboard can be a little rickety unless you have a fair amount of practice at it. There is a middle ground prototyping technique that is fast, and can be made very reliable.
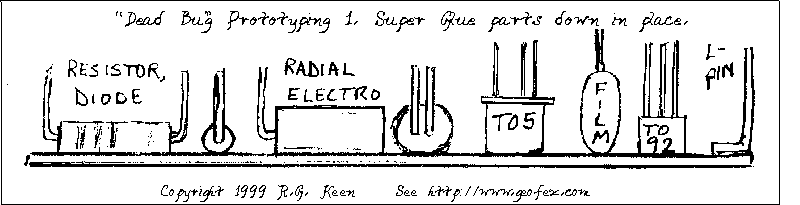
Some of you are familiar with "dead bug" prototyping - named for the resemblance of a DIP IC flat on its back with its legs in the air to a dead beetle. Dead bug style prototyping is usually only taken for a way to patch in an IC with the wrong pinout, but it can be extended to other parts as well.
With a dab of cyanoacrylate super glue on the end of a toothpick, you can mount most smaller parts on their "back" at least temporarily, like this:
You just bend the leads into the air, deposit a drop of super glue on the board substrate with a wooden toothpick, and place the parts on a likely substrate. The substrate board may be almost anything non-conductive. I have a fair amount of no-copper glass epoxy board that works well for me, but you could also use phenolic, perfboard, countertop laminate, or even cardboard, as we'll make it all much more sturdy later. When you place the parts, hold them for just a second until the super glue dries. If you're careful, you can place the parts in positions that are very much like the schematic for easy wiring.
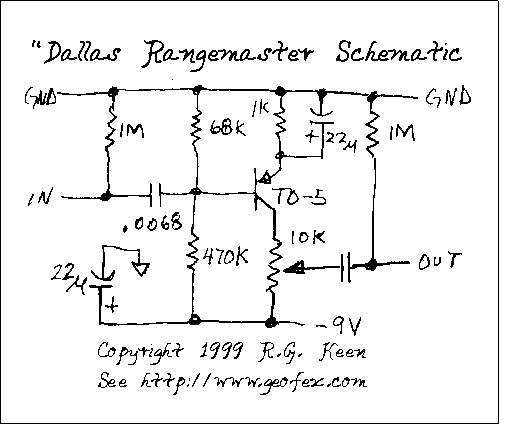
Let's do an example. Here's the schematic for one version of the Dallas Rangemaster treble booster:
Let's see how this translates to glued-down Dead Bug style prototyping.
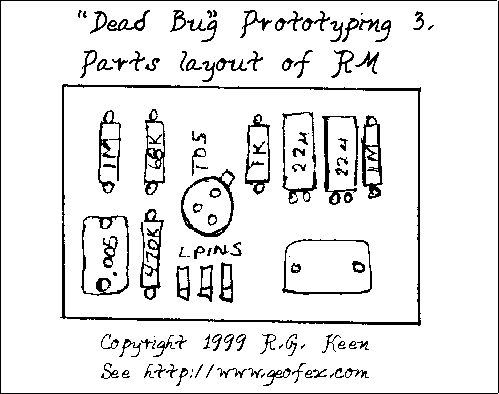
Notice that the parts go just about where they are in the schematic.
Now let's wire the thing together. The heavy lines are wires, and there is one insulated wire that crosses over other wires. Wire-wrap wire is fine for that.
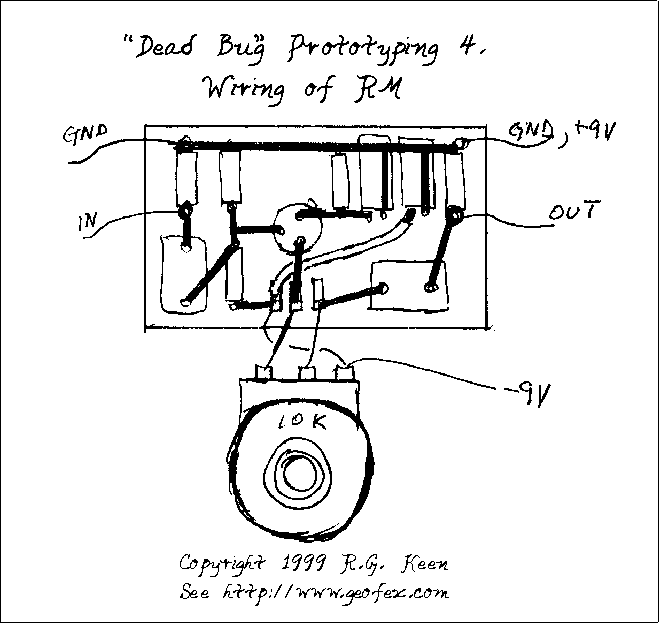
In this one, I've also shown how the circuit wires to the panel-mounted gain potentiometer. I used L-pins as terminals rather than just wiring to the flying component leads. It's a bit neater, and highly recommended. Radio Shack has L-Pins and/or J-pins.
Once this is all wired and tested, and you're sure that you are through making changes, we can pour the reliability in - literally.
Form a dike of masking tape around the board with masking tape as shown below. Fold the masking tape under the supporting board and seal it against the board. Crease the corners so it's relatively square. Make sure that all the wire leads come up out of the board for some distance. Now mix and pour in a small quantity of epoxy, polyester, or polyurethance potting mixture. When this is done and the goop cures, the circuit is permanent. It's sturdy enough to use on stage and on the road if you protect it from being physically broken, and should work for a long time.

The only down side to this is that you really can't repair the effect. Once the epoxy goes in, the mods and repairs are effectively over.
This does take a bit of time, and is really only suited to simple effects, but there are a lot of those to do. Have fun!