The Ins and Outs of Effect Bypassing
Copyright 1998 R.G. Keen All rights reserved. Served from GEO - http://www.geofex.com.
In the beginning there was the amp, and the guitar, and the sound was clean, but without tone, and a void was over the sound. And the Master Guitarist said "Let there be Fuzz." And his minions brought forth Overdrive and Overdrive begat Distortion and Distortion begat Fuzz, and the Master Guitarist listened on them and found them Good. And it came to pass that the Master Guitarist said to the Three "Go forth, be fruitful, and multiply." And the Three went forth and begat Reverb, and Tremolo, and ...
OK, maybe that's not exactly the way it happened. But it is certain that almost all electric guitarists have wanted to have some effects handy to jazz up the tone of their axe when the music calls for it. Originally the only way to do this was to twiddle the knobs on amp or guitar, or to plug and unplug another unit. Very shortly after that, someone figured out how to do this from a footswitch wired back to the amp, and the stomp switch selectable sound change never looked back. Today, with several decades of effects behind us, we are very fussy about how our effects get selected, demanding very high levels of convenience and technical performance.
The earliest and simplest of "bypasses" was a "cancel" switch, which usually did no bypass at all. This was common in the built in effects for amps, usually tremolo and reverb. The circuits that do these things are amenable to being "canceled" or "defeated" by a single switch, usually a switch to ground that disables the effect. For reverb, this is simply a switch that opens or grounds either the signal into the spring driver or the signal out of the reverb tank. Since reverb universally mixes the delayed signal with the "dry" or unchanged signal. For tremolo, the single switch can simply disable the oscillator that provides the modulation, and again the base signal is unchanged.
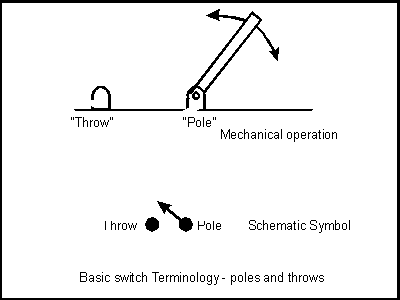
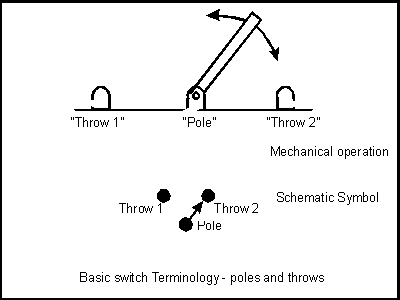
To better understand that is going on with bypass switches, a little illustration is in order. A basic switch is composed of one pole, which is the terminal that is moved to connect to one or more throws. Switches are named by the number of poles and throws, so the simplest switch is one that can just be connected to one throw or opened, and this is called a single pole single throw switch, or SPST for short. If a switch pole can be connected to two different throws, it is a single pole double throw (SPDT) switch, and to twelve throws, a SP12T switch. For understanding bypasses, we only need to know about SPST's, SPDT's DPDT's. and perhaps even 3PDT's.
A more widely applicable bypass scheme than interrupting the effected path was to use a single pole, double throw switch with the pole connected to the effect output terminal or jack and the switch throws connected to the input jack and the output of the effect. This did indeed bypass the whole effect by disconnecting the effect output from the output jack and in its place connecting the input jack, literally bypassing the effect as roads can bypass a town. However, the input of the effect itself had to remain connected to the dry signal all the time as well, and that caused some problems. Understanding how this happens can help understand some of the more estoteric effects bypassing schemes.
An effect circuit, like all electrical circuits, has some input and output impedance - literally how much it impedes the flow of current. A "high impedance" will let very little current flow, a "low impedance" will allow a much larger amount of current to flow for the same amount of electrical force or voltage. We measure impedance in ohms, an ohm being the impedance that allows one ampere to flow when one volt of electrical force is impressed across it. Since an amp is a relatively large amount of current, most signal electronics have impedances in the range of thousands of ohms, called kilo ohms or Kohms, or millions of ohms, called megohms or Mohms.
Guitar pickups also have some built in source impedance, a consequence of the fact that they are coils of wire with a resistance, inductance, and capacitances from wire to wire. What this means is that if you short a pickup, the pickup wire resistances, etc. will limit the amount of current they can put out. Pickups happen to be moderate impedances, about 8K ohms to 18K ohms are common. What this means is that if you drive a circuit with a guitar pickup that has an impedance of the same as the guitar pickup, half the signal is lost in the pickup itself and never appears in the circuit that you're driving at all. Composed of inductances and capacitances as well as resistances, pickup impedances vary with frequency so that they lose more treble than bass when driving low amplifier input impedances. You need a high impedance amplifier input to hear all the treble a guitar input can put out. This is common enough that the guitar/music world has coined a term for this treble loss from driving a low impedance - it's called "tone sucking". All this taken together means that guitars are believed to sound best when driving impedances of one half to one million ohms (0.5M to 1M ohm).
While it is entirely possible to design effects with these modestly high input impedances, most of the early effects were NOT designed this way, for reasons as widely varying as cost saving to simply not knowing (or caring) about the treble loss, to being designed for things other than guitar. The Univibe, for instance, was not designed strictly for guitar, as it has two inputs that are mixed together at the input and an input impedance of 67K ohms, low enough to cause noticeable treble loss. Another good example of this is the Crybaby wah pedal. In its stock configuration, it has an input impedance of perhaps 75K and is wired with the single pole, double throw (SPDT) bypass switch. These units are notorious for tone sucking.
Once guitarists noticed that their CLEAN sound suffered from having a bypassed effect in the line, they demanded better bypasses. This came in two flavors, true bypass and buffered bypass.
Buffered bypass is the technique of designing a high input impedance amplifier to go ahead of the actual effect circuitry. The input impedance of this buffer is high enough to avoid tone sucking, and it has an output impedance low enough to drive the rest of the effect with no loading even if the effect proper has a low input impedance. This also allowed electronic switching from dry to effected signals, and became a favorite of several Japanese electronic companies. The best example is probably the Ibanez xx-9 series, which includes the fabled Tube Screamer 808 and 9. These effects do not get a lot of reports of tone sucking, although purists sometimes demand that they be converted to true bypass.
True bypass is the standard of clean signal quality against which all other bypasses are measured. True bypass means that when the bypass switch is in the bypass position, the effect circuit is entirely disconnected, input and output, from the guitar's signal, and that the signal passes from the effect input to its output going only through wire and switch contacts. To see how a true bypass works, we can make up a hypothetical set of single pole, single throw (also know as simple make/break) switches and concoct a true bypass. For this, we only need three simple switches and some timing. Clearly we need two switches to break the path from the input jack to the effect input and from the effect output to the output jack. If these two are simultaneously opened or closed, they connect or disconnect the effect from the jacks.
Adding only one more simple switch which can connect the input and output jacks together, and which operates in opposition to the effect switches (closed when the effect switches are open, open when the effect switches are closed) gives the simplest true bypass setup. It is actually possible to make such a switch, and it would serve very well. However, such switches are not commercially available.
What is available commercially at a reasonable price is the Double Pole Double Throw (DPDT) switch. This switch has two pole contacts that may each be connected alternately to one of two throw contacts in tandem. There are three ways that this switch can be connected to give the proper connections and actions to implement the true bypass switch. Two of them leave an extra "throw" contact that is not wired to anything in the basic configuration, and the third just "wastes" the extra contact by using it redundantly in the bypass path. The version of true bypass with the DPDT that leaves an extra throw to which the input of the effect is connected when the effect is bypassed has been used in some pedals to good advantage to ground the input of high gain distortion effects, which produces some decrease in capacitively coupled noise.
If this was all that guitarists needed, then the music world would have been happy with DPDT's. However, as rigs grew more complicated, guitarists needed a way to tell if their effects were bypassed or not. Effects makers responded with pedals with the newfangled Light Emitting Diode (LED) indicators. An early example is the series of MXR pedals with both a bypass stomp switch and an indicator. This proved to be a real advantage in dark, smoky stages, and soon became almost a mandatory feature. However, guitarists soon noticed the vestiges of tone sucking creeping back in. The effects makers had not made up new and more complicated switches, they had simply used one section of the SPDT in the old tone sucking arrangement - the effect input was permanently wired to the input jack and co-opted the second SPDT section to turn an LED on and off.
Hard switch (as opposed to electronic or soft switch) bypass technology stood at this impasse for a couple of decades. (For a more complete understanding of bypass technology, there is a "soft switch" bypass article that is coming, an will be linked here.)
The standard for stomp switches, which had to be very robust mechanically since they were literally intended to be stomped on, was the Carling 316PP, which was a DPDT intended for switching AC electrical power that happened to be very reliable in this application. Similar switches were made by Cutler-Hammer, Eaton Industries, and the European Arrow. Carling also offered the "641" stomp switch, almost identical to the "Arrow". These switches were not designed for effects switching at all, but for switching AC power. They shared the characteristics of being expensive and not commonly available.
In any case, effects either used an indicator or true bypass but not both. Some boutique effects makers in the last few years had located a triple pole double throw switch (3PDT) that had yet another section. This could be used to switch a status indicator while the other two poles did true bypass, but these switches were physically more delicate than the old standards and also even expensive and less widely available, even more so than the old standard DPDT's. As of this writing, I have heard that there is another 3PDT that has become available from Fulltone. This switch is claimed to be both high quality and relatively inexpensive for a 3PDT, but I have not personally seen them, and to my knowlege they are not available in small quantities at all.
Very recently, two methods of breaking the true-bypass versus LED-indicator impasse were found.
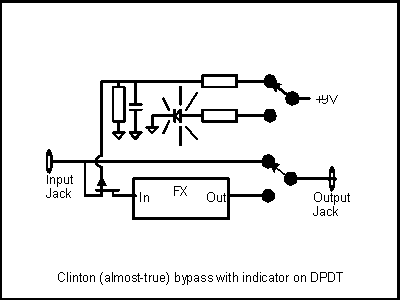
One is known as the "Clinton bypass" or almost-true bypass method. This method connects one pole of a DPDT to the output jack and its throws select the effect output or the input jack. The second section of the DPDT turns an LED indicator on as in the tone-sucking DPDT bypass, but the alternate throw of the indicator switch section also passes a control voltage to a simple switch which is wired between the input jack and the input of the effect. In the illustration, the simple switch is implemented by a P-channel JFET, switched between fully conducting and fully off by the control voltage. When on, the JFET may be a resistance of as little as 100 ohms depending the device type, and when off it is many megohms. This very large off resistance is almost as effective at isolating the input jack from the effect input as is an open mechanical switch, and so tone sucking is avoided. The switch behaves like a true bypass although some effect circuitry still touches the signal, hence the name. This trick can be done even more simply with the now-available LED/photo-FET optoisolators like the H11F1/2/3 by simply including the LED that turns the photo-FET on in series with the indicator LED, and substituting the photo-FET for the series P-channel JFET at the effect input.
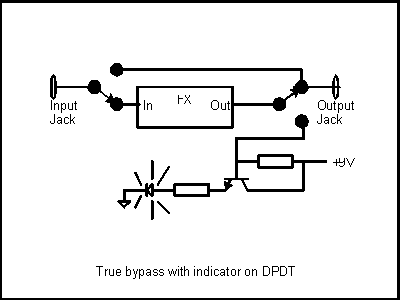
The second method is very new, and is a genuine true bypass switch with an indicator based on the DPDT. In this variation, one SPDT pole is wired to the input jack with throws on the effect input and the output jack. The second SPDT pole is wired to the effect output and the throws are connected to the output jack and the LED switch circuitry. The switch phasing is such that when the input section selects the effect input, the effect output is connected to the output jack. When the input section selects the output jack for bypass, the effect output is connected to the LED switch circuitry.
There are some special requirements on both the effect output and on the LED switch circuitry. The effect output must have a DC resistance to ground, and this resistance must be low enough, depending on the LED switch circuitry, to avoid pops and clicks when the bypass switch is thrown.
A word about pops and clicks - almost all effects are powered by a single 9V battery, and this means that for DC biasing reasons they have both an input and an output DC blocking capacitor to carry the signal into and out of the circuit. No capacitor is perfect, and whenever the outermost end of either capacitor is open-circuited by a hard (mechanical) bypass switch, the leakage will allow some of the voltage to bleed into the outer terminal. When the capacitor is again connected, it no longer perfectly matches the average ground level of the signal, and this voltage is coupled into the signal path as a pop, the loudness of which depends on the size of the capacitor and the amount of the voltage change. The cure is simple - put another resistor on the outermost lead of the cap to pull it to ground permanently, even when the bypass switch is open. Leakage current from the capacitor is conducted to ground by the pull-down resistors and so no DC-offset pop can occur. For the purposes of curing leakage-clicks, the resistors can be quite large, from 1M to many megohms.
The true-bypass-with-indicator technique relies on the output of the effect having such a pull down resistor. The pull down not only holds the output capacitor at the proper voltage, it also pulls the input of the LED switch circuit to ground, and this causes the LED to be switched off. The LED circuitry must have a very high input impedance, because the amount of current that the resistor pulls down also pulls the voltage of the output cap UP, and this can cause a pop. The earliest version of this arrangement of which I'm aware appeared in the Proco Turbo Rat distortion pedal, which used an NPN darlington transistor with its base fed from the 9V supply through a 10M resistor. When pulled to ground by a 10K resistor on the output of the effect circuit, the darlington switched an LED off. When released from the effect-output resistor, the 10M resistor provided enough base drive to drive the darlington on, powering the LED.
This method illustrates the problem with this approach. Even with a 10M input impedance and a 10K pull down resistor, the output capacitor was pulled up some 8.4millivolts (mv) which doesn't sound like a lot. However, it's about one tenth as much as a typical (if there is such a thing) guitar signal, so this has the potential to cause a faint but noticeable pop. With a resistor for a pull up on the LED drive circuitry, the output DC resistance of the effect circuitry must be limited to no more than 10K or so. This can be a very severe restriction on a pedal, as some vintage effects simply can't drive a 10K resistor on their output without changing their tone. We really need a way to get this true-bypass-with-LED scheme to work without the 10K limit. If we can get to 100K or even better, 1M, then this bypass technique becomes more universally applicable.
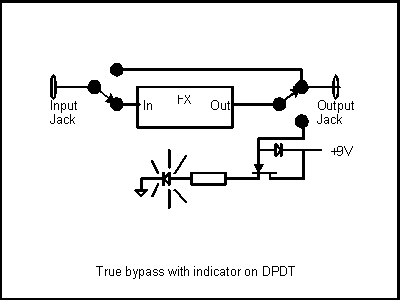
The improved version of this technique, which I modestly call the "Millenium Bypass", uses an N-channel JFET to provide the drive to the LED, but the pull up current to its gate is provided by the leakage of a reverse-biased silicon diode to +9V. The leakage current of this diode is measured in nano-amperes (billionths of amperes!), but it is enough to guarantee that the JFET will turn the diode on. At the same time the leakage is so low that the output resistors may be as large as 100K and still have no clicks when the effect is switched.
This trick is not perfect of course - nothing is. The actual leakage of the diode will vary from diode to diode, as will the gain of the JFET, the gate threshold voltage of the JFET, and the max current the JFET will supply (Idss). It works best with JFETs with Vgs(on) specifications of under 5V, although it will work less well with almost any JFET. Using a high-threshold JFET or one with a low Idss will mean that the LED won't turn completely off, and may not be very bright when it's "on". Using a low-threshold JFET and one with an Idss rating of 5ma or more will give a much better change in on-to-off brightness in the LED. You can also use a diode or two in series with the LED to sharpen things up a bit.
You may also notice that the LED comes on slowly instead of blinking directly to full brightness. This is one of the few places where you can actually see what is happening in a semiconductor junction. What is happening here is that the nano-ampere leakage current of the diode which is what actually moves the gate voltage of the JFET is acting as a current source and ramping up the 2-3picofarad input capacitance of the JFET gate. This is what causes the slow ramp, and you can literally see it as the gate capacitance charges.
You can see how the Millenium Bypass could be used in an external true bypass box.