Simple, Easy Parametric and Graphic EQ's, Plus Peaks and Notches
Version 1.1 Copyright 1999 R.G. Keen All rights reserved. See http://www.geofex.com
If you're into playing with tone controls and notch filters to see how they change the sound out of your effects, you will undoubtedly have built several glops of R's, C's and pots, maybe some L's to make up the tone networks. While this is fun, it's not very flexible. Sooner or later you might wonder if there is a more general solution to messing with tone controls.
Good news, there is.
Everyone is familiar with the sound of a wah pedal. This is a resonant peak in the signal that can get moved around. Not so familiar is a notch, or a sudden reduction in level at one frequency. Sometimes a notch can be very useful in getting a specific sound.
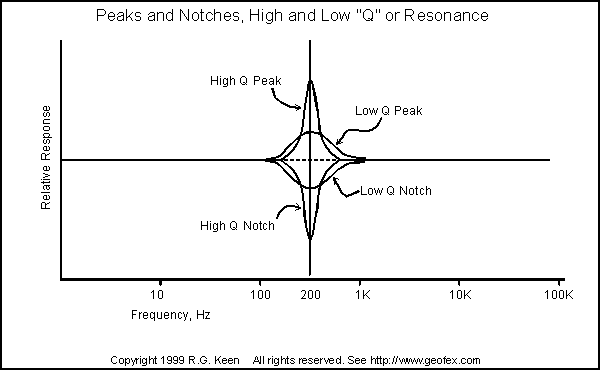
Even better would be if you could get either a peak or a notch, depending on how you set the controls - something like the frequency response diagram. The diagram shows the possible frequency responses of a variable Q peak/notch filter.
"Wait a minute! What's Q?" I hear you ask. The techie explanation is that Q is the energy stored divided by the energy dissipated per cycle in a network. Let me translate that into something more useful.
A guitar string will vibrate a long time if plucked. The initial pluck that sets it into motion stores a chunk of energy in the string that is saved by the interchange of motion for string stretch on every vibration. It dissipates very little of its energy per cycle, so it stays in motion a long time - it's a high Q mechanical filter. If you put your finger on the string, it stops ringing very quickly because your finger damps it, removing a lot of energy as the string moves. Your finger has lowered the Q of the vibrating string, removing a lot of energy from it each vibration, so it stops vibrating quickly.
Q is also a measurement of bandwidth. Another engineer's measurement of Q is to divide the center frequency of the filter's response by the difference between the frequencies where the response is 1/2 of the center response.
Q is kind of a measurement of resonance, then. A moderately resonant filter is like a wah pedal - There is a peak of frequency response at the resonant frequency of the wah. To give you an idea about how Q relates to sound, most wahs have a Q of about 2-10. Q is also related to selectivity. A high Q filter, like a guitar string, vibrates primarily at one frequency. As Q gets lower, the resonance gets wider in frequency.
A high Q notch is just like the reverse of a high Q peaking filter. A notch filter has a kind of a dead zone where there is very little or no response to signal - very much like a guitar string with a dead or muffled note on one fret. The higher the Q of a notch filter, the more the response is cut at the notch frequency and the narrower the band of frequencies that are cut. Low Q notches cut a broader band of frequencies by a lesser amount.
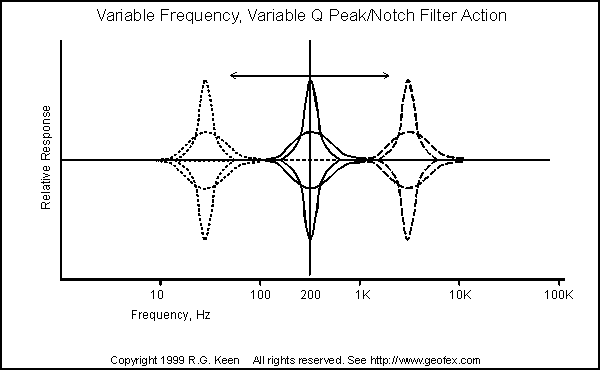
For our super-variable tone control, we'd like to not only have the peak/notch depth adjustable, we'd like to move it around in frequency, like the sketch at the right shows.
Here's a simple circuit to start building our tone control.
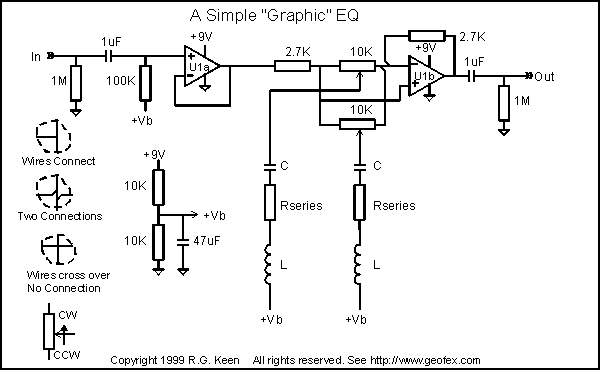
The circuit is a simplified version of a hifi graphic EQ. There are a number of series L-C filters which are connected to the wipers of a pot, one per L-C filter. It is a characteristic of a series LC filter that it has a high impedance except at its resonant frequency. At that frequency, the series impedance drops to a minimum, which is zero if the components are perfect. The resonant frequency may be calculated as Fr=1/(2*pi*SQRT(L*C)).
The pots are connected between the inverting and noninverting inputs of an opamp. The opamp also has input and feedback resistors.
Effectively, the wiper of each pot is grounded through the low impedance of the LC filter at that frequency. The pot wiper may be dialed to the input side, in which case it shunts the input to ground, producing a notch in the frequency response at its center frequency. It may also be dialed to the inverting input, which shunts the feedback to ground at its resonant frequency, producing a peak when directly in the center, there is no effect from the LC filter at all - frequency response is flat. In this position, the LC filter's effect is equal on both + and - inputs, so there is no overall effect.
If the LC filter has a non-zero resistance, it no longer looks like a short to ground at the center frequency, but a resistor. This has the effect of making the frequency selectivity less radical - it sounds less resonant - the"Q" has been lowered.
From the schematic, you can see that the setup is pretty simple - a buffer opamp in front of things to make sure that there's no loading on the source driving the circuit, and the output opamp, with the LC filters tied to the wipers of pots strung acrosss the inputs of the opamp. By adjusting the series resistor in each LC filter section, we can make the filters as narrow or wide as we like, and we can add as many filter sections as we like. Common numbers of frequency bands in graphic EQ's are 5, 7, 10, 20, up to 31. If the Q's are chosen properly with relationship to the center frequency of the LC filters, each filter is independent of the others.
But now we need to make the center frequencies variable. That's a bit harder. To change the resonant frequencies of the LC networks, we have to change the values of the C's or L's. While there are variable capacitors and inductors, they are bulky and expensive. We need a way to make them small and cheap.
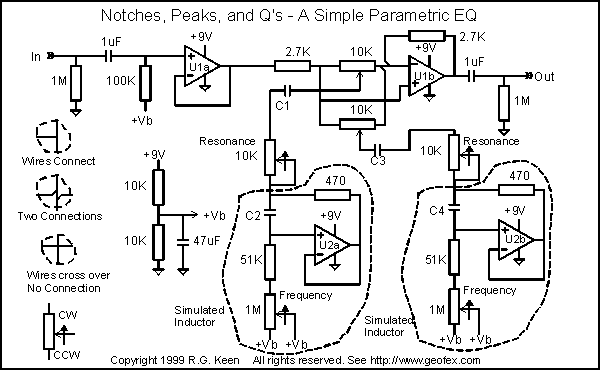
Here's one way to do that. There is a circuit trick that uses an amplifier, a couple of resistors and a capacitor to make a network that looks like an inductor with one end grounded to the rest of the network.(These circuits are called gyrators for those of you who want to dig deeper.)
If we substitute these simulated inductors for the real inductors, we get what acts like a variable inductor. For the first simulated inductor shown, the inductance is equal to the value of C2 times the 470 ohm resistor times the series resistance of the 51K and the setting of the 1M pot. Or more prosaicly, Leff = R1*R2*C, where R1=470, R2= series resistance, and C = C2's value.
Doing a little math, we can come up with some values of the frequency range for an LC section. The L value is
Lmin = 470*51K C2 and Lmax = 470 1.05M*C2, or
Lmin/Lmax = 51K/1.05M = 0.048 or about a 20 to one range.
The center frequency of an LC filter is F0=1/(2*pi*L*C), so the range of min to max frequencies is equal to the square root of the variability of the inductance, or about a 4.5:1 frequency range. The "Q" of the LC filter section is limited by the equivalent series resistance of the simulated inductor. The 470 ohm resistor always appears to be in series with the simulated inductance, so we can add external resistances to lower the Q. That is the function of the "resonance" control. This pot allows you to lower the Q substantially. In fact, you may never need that much resistance, so you may use a smaller pot as needed.
Some good places to set the frequency bands for these controls are from about 100 Hz at a minimum up to several kHz. We only get about a 4.5:1 range, so we can pick some values. If we use C1= 0.15uF and C2 = 0.02uF, we get a range of about 100Hz to 450Hz (roughly - everything affects this, but it's a variable, so the exact value doesn't matter as much). For a second section, we can use C3 = 0.022uF and C4 = 0.01uF to get a range from about 450Hz to about 2000Hz.
These two sections allow us to put either a resonant peak or a notch with a variable resonance from essentially flat up to a fairly high Q at any frequency from 100 to 2kHz. Obviously, we can add more sections. I picked a two-section filter for this example so I could build it with only two dual opamps. A third dual opamp would add two more sections, and a lot more flexibility
This is one of those widgets that is so flexible that it can be hard to work, and can easily have more knobs than you can easily learn! You have three controls per section - frequency, boost/cut and resonance or "Q". On the other hand, you can also make this baby jump through hoops. You have a flexibility and a directness of control that is simply unavailable any other way.
I'll be expanding this article in the future with more mods and extensions to the basic circuit. You can already guess some of them - if you've read the "Technology of Wah Pedals", you can readily recognize that each section of LC filtering constitutes a resistor-to-ground wah circuit, but with the option to make it a notch as well. That means you can apply all the tricks mentioned in the Wah Technology article to this one - replacing the resistor to ground with an electronically or optically variable resistor to drive it from an envelope or LFO. The sections can be driven in concert or in opposition (or randomly!) so there is a whole universe of effects that you can do with this basic circuit.
A simple graphic EQ
As I mentioned earlier, the parametric EQ is a more-general case of the graphic EQ. A graphic EQ is a set of fixed-frequency, fixed-bandwidth/Q filters set up so their frequency ranges match tidily at their half-power points, so that when they're all set to match, there are no "holes" or overlaps between the adjacent bands. A graphic EQ has only one boost/cut pot for each frequency band, and these are usually set up as slider pots so that the position of the slider knob provides a visual indication of the frequency response curve. The world is practically floating in semi-unused stereo graphic EQ's that can be had for very little to no money, but there are alway some of you (us!) that will want to build your own.
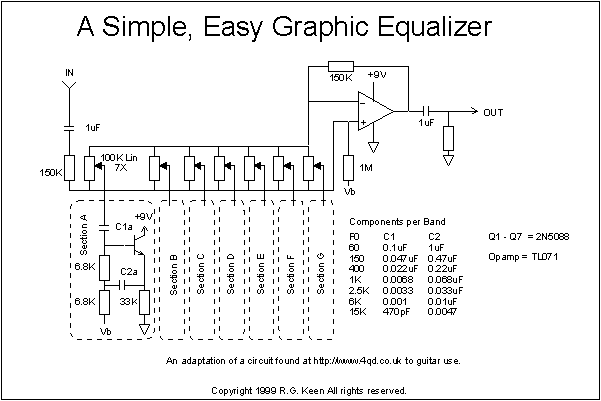
Here is a circuit diagram of a simple to build graphic EQ. Notice that the circuit is very repetitious. the frequency selective elements are made of capacitors and "gyrators" that simulate the response of grounded inductors. These make the circuit free of real inductors, and are simpler to tune if tuning is needed. With standard value components, the frequency ranges come out a bit imperfect, but this is usually not noticeable in real situations.
I did a test PCB layout for this circuit, and another for a commercial single-chip graphics-EQ IC, the KA2223. Note that these layouts are not tested yet; however, if there's enough interest, they may be made available at GEO. I did both boards to exactly the same physical size, 3.2" by 1.95", just to see what the differences in "congestion" and density were. Surprisingly, even though the single IC version does have far fewer parts on the board, the board size could not be reduced a great deal over the size of the discrete version. This is a consequence of the fact that a lot of board area is taken up by the wiring to get from the single IC out to the dispersed places the pins had to be connected to. In the discrete version, the various components could be distributed out to where they were needed, cutting down on the wiring congestion.
Some recent commentary from Ed Rembold, Mark Hammer, and others has suggested that the ideal EQ for guitar use may be a hybrid of the graphic and parametric EQ's. Some players have contended that they need the greatest flexibility and adjustability between 700Hz and 1500Hz, not simply a couple of fixed bands, while they would prefer to have the bands of a graphic EQ bunched up a bit below these frequencies. Instead of a 60/120/240/500 Hz set of bands, perhaps only two or three bands at 80-100/200/400 Hz would be enough; a similar setup above the 700-1500 Hz range would allow adjusting treble. There is still some work going on in these areas.
All that's necessary to do this with the basic EQ structure is to make higher-than-normal-Q (that is, narrower in frequency) bands suited to the guitar frequencies, and spot some parametric EQ sections in the center of the range.
A commercial guitar graphic EQ I have has bands centered at 100/200/400/800/1600/3200/6400 Hz.
Other peaks and notches
You may not want to go the full way with building a parametric EQ, graphic EQ or hybrid, and may only want to add a bit of response curve life to your tone. That's not too hard, either. The key to that is either an active or passive filter that varies the response. There are LOTs of these, but there are a few that are very easy and simple as well as being broadly applicable. The first is the "Twin T" notch filter. A basic twin T is shown in the next figure.
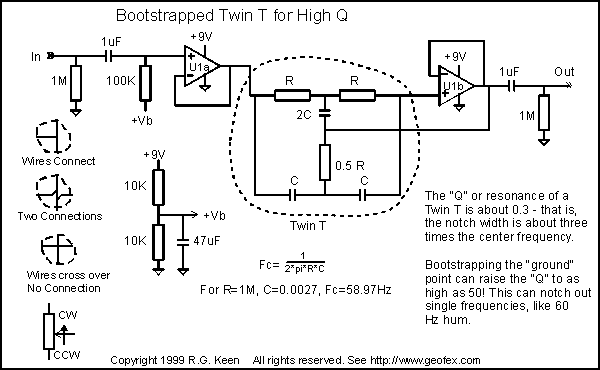
The section shown in the dotted line is a basic Twin T, if you ignore the opamps and connect the center junction of the 2C/0.5R leg to ground. The twin T is one of the very few filters made from only resistors and capacitors that can cause an infinitely deep notch or attenuation. That is, at the exact center of the frequency dip it causes total attenuation of the signal.
The T has a low "Q", only about 0.3. In bandwidth terms, the width between half-power points is about three times the center frequency. That's pretty wide for any tone shaping. To get more "Q" and a sharper response, you can "bootstrap" the twin T with an opamp, shown as U1b. Connecting the point that would otherwise be grounded to the output of a voltage follower sharpens up the notch of a twin T a lot. You can easily get "Q's" of 50 with fast JFET opamps like the TL07x series. That's narrow enough to use in a PA system to simply notch out 60Hz hum, and in fact, that's how they are often used.
For tone shaping purposes, though, that's a little too sharp, just as the un-aided twin T is a little broad. Since the bootstrapped T is something like the bootstrapping that is done to the capacitor in an inductor-style wah, it's tempting to think that we can just set the bootstrapping with a pot. In fact, that works.
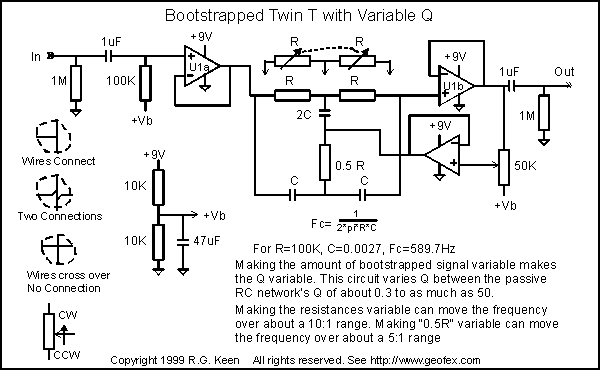
We can simply put a volume pot on the output of opamp U1b, leaving it just functioning as a buffer to keep the T unloaded, and use another opamp to drive the bootstrapping point of the T. This opamp is driven from the wiper of the pot, however. You can see that if the pot is fully up, the T is getting full bootstrapping for a Q of 50 or so, and when the pot is full down, the output of the second opamp is holding the bootstrapping point at ground, so the Q is the unaided 0.3. In between, you get all the other Q values!
We can set this thing to be about an octave wide (Q=1), a half octave (Q=2), or a single note (Q= about 10 or more).
That's nice, but what about moving the frequency around? Right now, we can only notch one place.
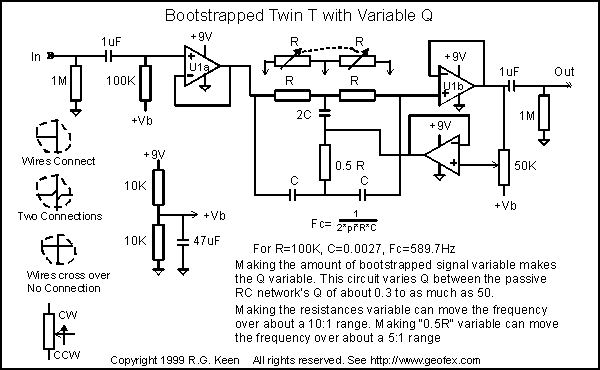
No problem. The Twin T can be varied in frequency by adjusting the components. There are a couple of gotcha's here to be aware of, though. The Twin T is sensitive to the balance of the parts that make it up. For deepest attenuation, it really requires that the parts be in the ratios shown - that is, two R's and one 0.5R, two C's and one 2C. Any deviation from these will mean that the depth of the notch will be less than infinite. However, we don't really need infinity, a 20db notch is a very effective tone control.
We can use a dual pot and vary both R's simultaneously, and get about a 10:1 frequency range out of the T. We can also vary the 0.5R leg and get a much smaller frequency range. Doing that within a bootstrapped Twin T setup makes for a frequency variable adjustable Q notch filter.
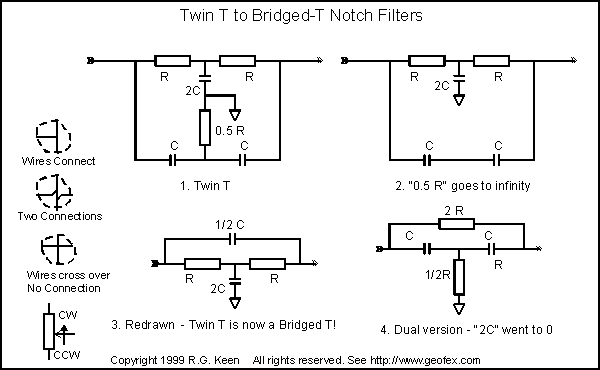
You've probably seen other RC filters used for scoops and notches. There are several of these, but one that comes up pretty often is the Bridged-T. This is a very close relative to the Twin T, as you can see from the sketch. If you take a basic Twin T and let the 0.5R leg resistance go to infinite resistance, and then combine the two series capacitors into one cap of 1/2 C, you get the Bridged-T. This thing is amenable to bootstrapping and frequency changing in very much the same way that the Twin T is.
If you let the 2C leg go to 0 capacitance, you can rearrange the Twin T into the "dual" of the first bridged T, and you get the second version. Very similar results.